


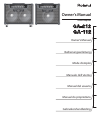


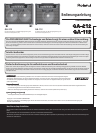

Panel Descriptions
5
Deutsch Français Italiano Español Português NederlandsEnglish
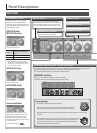
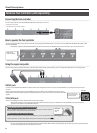
[EFX LOOP A] Button, [EFX LOOP B] Button
Switches on/o any external eects unit connected to the EFX LOOP A/B
jacks on the rear panel.
[ON] Switch
This switches the unit on/o.
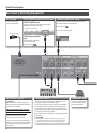
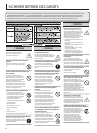
Switching the unit on
* Once everything is properly connected (p. 6), be sure to follow the procedure
below to turn on their power. If you turn on equipment in the wrong order,
you risk causing malfunction or equipment failure.
* Before turning the unit on/o, always be sure to turn the volume down. Even
with the volume turned down, you might hear some sound when switching
the unit on/o. However, this is normal and does not indicate a malfunction.
* This unit is equipped with a protection circuit. A brief interval (a few seconds)
after turning the unit on is required before it will operate normally.
1. Turn on all the devices connected, but not the device
connected to the LINE OUT jack.
2. Turn on the GA-212/GA-112.
3. Turn on the device connected to the LINE OUT jack.
Switching the unit o
1. Before switching o the unit, lower the volume on
all the devices and then turn o the devices in the
reverse order to which they were switched on.
CAUTION
* With the factory settings, the GA-212/GA-112 will automatically be switched
o 4 hours after you stop playing or operating the unit. If you don’t want the
unit to turn o automatically, set the [AUTO OFF] switch to “OFF” as described
on p. 6.
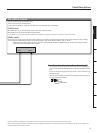
* If you need to turn o the power completely, rst turn o the unit, then
unplug the power cord from the power outlet. Refer to Power Supply (p. 3).
[MASTER] Knob
Adjusts the overall volume.
[PRESENCE] Knob
Gives a lustrous contour to the
mid and upper ranges. This
gives a clear, open sound.
[REVERB] Knob
Adjusts the level of reverb.
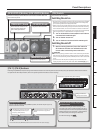
[CH 1]–[CH 4] buttons
Excluding the [MASTER] knob, the settings of all knobs and buttons on the front panel are saved in the [CH 1]–[CH 4] buttons. This function saves the
last positions of the knobs; therefore, there is no special operation needed to save the settings.
Switches four types of front panel settings.
Range in which the
settings can be saved.
Copying the button settings
You can copy the settings of the [MANUAL] button, or each of the [CH 1]–[CH 4]
buttons to another channel.
Hold down the button to be copied,
i.e. the [MANUAL] button or any of
the [CH 1]–[CH 4] buttons...
1
Select and press any of the [CH 1]–[CH
4] buttons to which a copy will be
made.
2
* You cannot select the [MANUAL] button as the channel which will receive the copy.
Saving the channel settings using the write
operation function
The automatic saving of channel settings can be
changed to the saving of channel settings by using
the write operation. In the write operation mode, by
holding down any one of the [CH 1]–[CH 4] buttons
for a few seconds, the settings can be saved.
To make the setting, see
p. 10