


5
Português Italiano DeutschNederlands Español Français
English
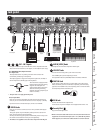
Producing Sound
Turning the power on/o
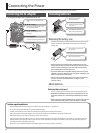
Once the connections have been completed, turn on power to your
various devices in the order specied. By turning on devices in the
wrong order, you risk causing malfunction and/or damage to speakers
and other devices.
1. Make sure that the power to all equipment is turned o.
2. Connect your external equipment.
3. Set each of the KC-110’s level knobs and the [VOLUME] knob
to 0.
4. Switch on the power to any external equipment connected
to CH 1–3 or AUX IN jacks.
5. Switch on the KC-110’s power.
6. Power up the equipment connected to the LINE OUT jack.
To turn the power o, reverse these steps.
NOTE
• To prevent malfunction and/or damage to speakers or other devices,
always turn down the volume, and turn o the power on all devices
before making any connections.
• This unit is equipped with a protection circuit. A brief interval (a
few seconds) after power up is required before the unit will operate
normally.
• Always make sure to have the volume level turned down before
switching on power. Even with the volume all the way down, you
may still hear some sound when the power is switched on, but this is
normal, and does not indicate a malfunction.
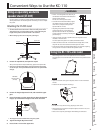
• If you’re operating the KC-110 only on batteries, the POWER indicator
will become dim as the batteries run low.
When the batteries run even lower, the POWER indicator will blink.
Replace the batteries as soon as possible.
• If the batteries are extremely low, the sound will be more likely to
distort, and you may hear distortion at high volume levels. This is not
a malfunction. Either replace the batteries, or use the included AC
adaptor.
• Expected battery life under continuous use:
•
Alkaline batteries approximately 7 hours
• Nickel-metal hydride batteries approximately 8 hours
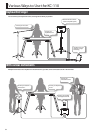
• Howling could be produced depending on the location of micro-
phones relative to speakers. This can be remedied by:
1. Changing the orientation of the microphone(s).
2. Relocating microphone(s) at a greater distance from speakers.
3. Lowering volume levels.
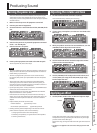
Adjusting the volume and tone
1. Set the level knob of each channel to 5 (center).
Lower the knobs of any channels you’re not using.
2. If you’re using a microphone, turn the CH 1 level knob to the
MIC range.
3. While you produce sound on the connected device, turn the
[VOLUME] knob to adjust the overall volume.
4. Use the level knobs of each channel to adjust the volume
balance of the connected devices.
5. Use the [VOLUME] knob to adjust the overall volume, and
use the [LOW] (low range) knob and [HIGH] (high range)
knob to adjust the tone.
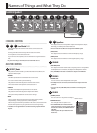
Applying an eect
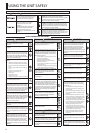
1. Use the [EFFECT] knob to select an eect and adjust its depth.
WIDE
CHORUS
REVERB
The left half of the knob’s range produces reverb (p. 6) and the right
half produces chorus (p. 6). Turning the knob all the way to the right
produces a wide chorus eect (p. 6).
Within each range, turning the knob toward the right will increase the
eect.
* The eect is not applied to the sound that’s being input from AUX
IN jack.