


7
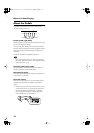
Panel Descriptions
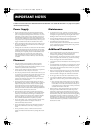
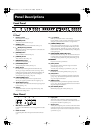
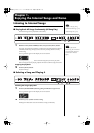
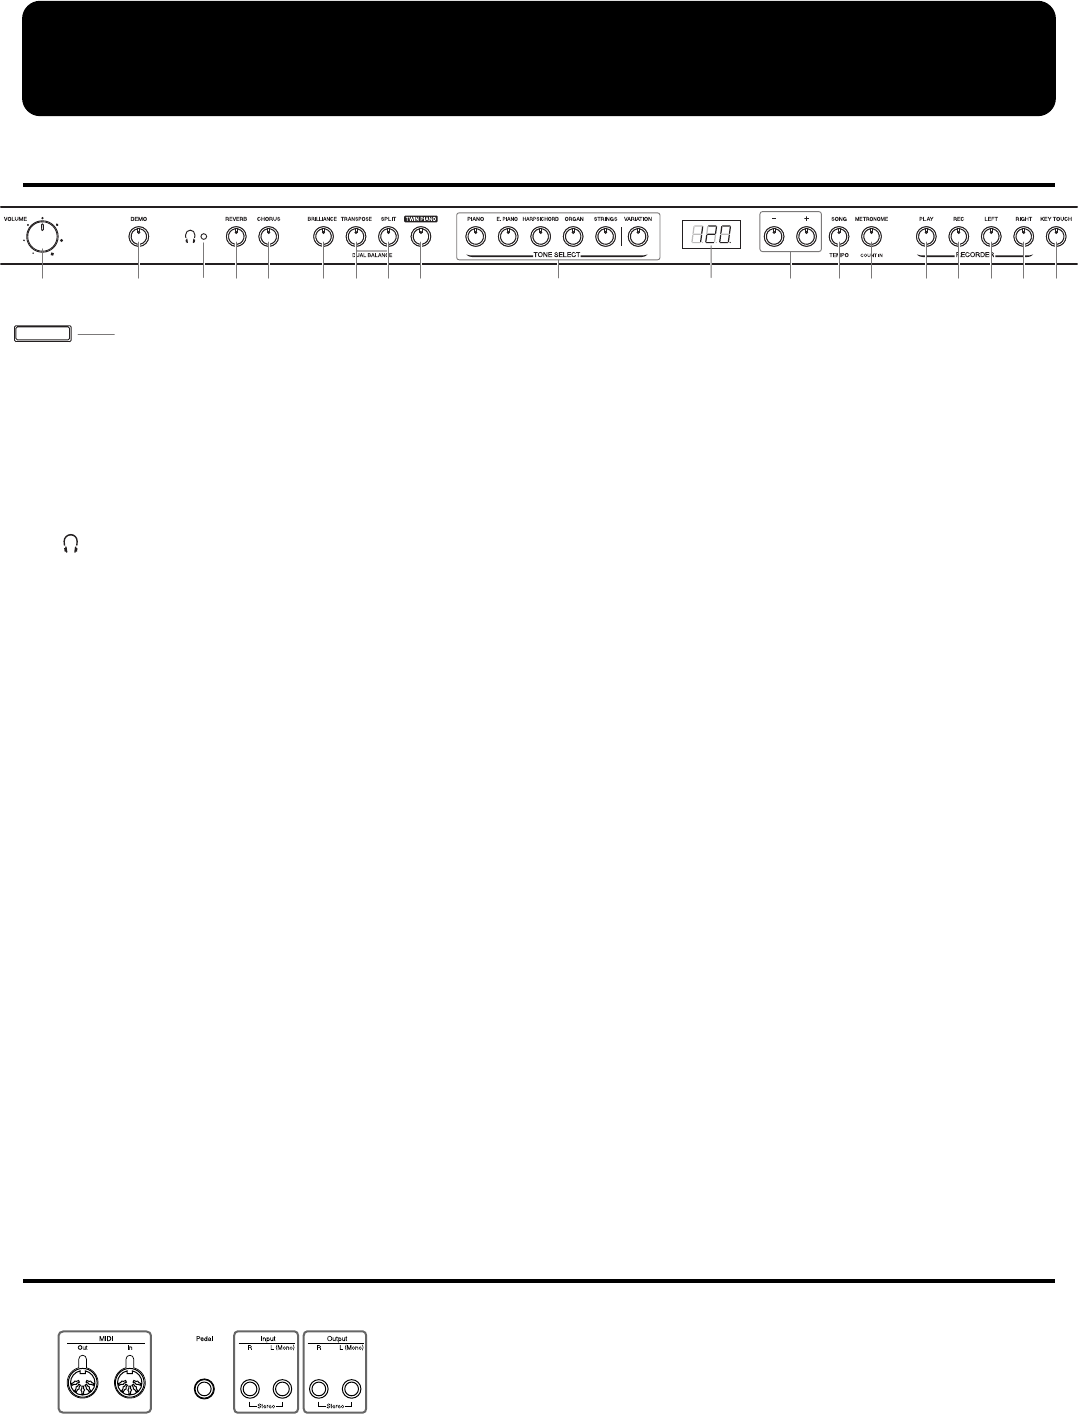
Front Panel
1
[Power] switch
Turns the power on/off (p. 9).
2
[VOLUME] knob
Adjusts the overall volume level (p. 9).
3
[DEMO] button
You can listen to a demo of the instrument’s tones (p. 13).
4
[ (Headphones)] indicator
This indicator lights up when headphones are connected to the
headphones jack (p. 8).
5
[REVERB] button
Adds reverberation to the sound (p. 16).
6
[CHORUS] button
Adds richness to the sound (p. 16).
7
[BRILLIANCE] button
Adjusts the tone brightness (p. 9).
8
[TRANSPOSE] button
Transposes the pitch of the keyboard (p. 17).
9
[SPLIT] button
Divides the keyboard into right-hand and left-hand areas,
allowing you to play a different sound in each area (p. 20). By
holding down this button and the [TWIN PIANO] button, and
pressing other specified button, you can make settings for
various functions (p. 32–p. 36, p. 38–p. 39).
10
[TWIN PIANO] button
You can divide the keyboard into two separate sections,
allowing two people to perform in the same registers (p. 18).
11
TONE SELECT buttons
They are used to choose the kinds of tones (tone groups) played
by the keyboard (p. 14).
12
Display
Displays information such as the song number, tempo, beat,
and parameter settings values.
13
[-] [+] buttons
Allow you to select the value of various settings.
Pressing both the [+] and [-] buttons simultaneously returns the
setting of a particular item or function to its original value.
14
[SONG/TEMPO] button
Used to select from the internal songs (p. 11, p. 23). Each time
you press this button, the song number and the tempo will be
displayed alternately. While the song number is displayed, the
button indicator will light in red. While the tempo is displayed,
it will light in green.
15
[METRONOME/COUNT IN] button
Turns the metronome on/off (p. 21). Also featured is the count-
in sound, which can be played before the song starts, allowing
you to begin playing with the song with perfect timing (p. 23).
RECORDER
Plays back or records a performance.
16
[PLAY] button
Starts and stops playback of internal songs and recorded
performances (p. 11, p. 26).
Also starts/stops recording of a performance (p. 26–p. 30).
17
[REC] button
Puts the MP-70 in recording-standby mode (p. 25–p. 30).
18
[LEFT] button
Plays back or records a performance separately for each hand
(p. 24, p. 27–p. 30). The left-hand performances of the internal
songs are assigned to this button.
19
[RIGHT] button
Plays back or records a performance separately for each hand
(p. 24, p. 27–p. 30). The right-hand performances of the internal
songs are assigned to this button.
20
[KEY TOUCH] button
Modifies the playing feel of the keyboard (p. 15).
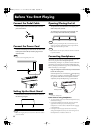
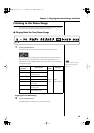
Rear Panel
1
MIDI Out/In connectors
Connect to external MIDI devices to exchange performance data
(p. 38).
2
Pedal connector
Connect the pedal cable of the special stand to this connector
(p. 8).
3
Input jacks
These jacks can be connected to another sound generating
device or an audio device, so that the sound of that device will
be output from the MP-70’s speakers (p. 37).
4
Output jacks
Allows you to output the piano’s sound to sound reinforcement
equipment to obtain a more powerful sound. These can also be
connected to a tape recorder or other recording device to record
a performance (p. 37).
1234
2
Power
1
3 456 78910 11 12 13 14 15 16 17 18 19 20
MP-70_e.book 7 ページ 2006年3月29日 水曜日 午後4時17分