


5
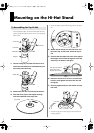
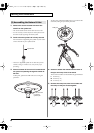
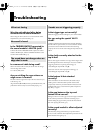
Mounting on the Hi-Hat Stand
* Due to the different shape, the clutch included with the hi-hat
stand cannot be used with the VH-12. Be sure to use the special
VH-12 clutch.
fig.Clutch.e
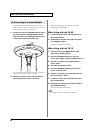
1.
Use the tuning key included with the VH-12 to
loosen the clutch bolt, then simultaneously turn
and remove the clutch top.
fig.Clutch-2.e
2.
Remove the two lock nuts and the felt washer.
3.
Pass the screw pipe of the stopper through
from the underside of the top hi-hat.
fig.Top-01.e
* Orient the stopper so that it matches the groove in the top hi-
hat.
fig.Top-02
4.
Attach the felt washer, the two lock nuts, and
the clutch top, in that order, above the top hi-
hat.
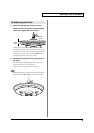
5.
Confirm that the upper end of the screw pipe of
the stopper can be seen through the slit of the
clutch top, as shown in the figure.
fig.Top-03.e
6.
Orient the clutch screw so it’s in a convenient
location, then tighten the clutch bolt with the
tuning key.
7.
Securely tighten down the felt washer and two
lock nuts.
fig.Clutch-3.e
* Looseness or play in the clutch may prevent the hi-hat from
operating properly.
(1) Assembling the Top Hi-Hat
Clutch Screw
Clutch Top
Lock Nuts
Felt Washer
Stopper
Clutch Bolt
Clutch Top
Clutch Bolt
Top Hi-Hat
The upper end of the
screw pipe of the
stopper can be seen
Lock Nuts
VH-12_e 5ページ 2005年10月5日 水曜日 午前10時26分