


7
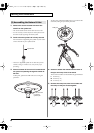
Mounting on the Hi-Hat Stand
6.
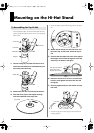
Attach the clamp and holder to the pipe on the
upper part of the hi-hat stand, then slightly
tighten the assembly with the tuning key.
fig.Bottom-03.e
7.
Pass the ends of the holder through the
grooves in the metal portion of the bottom hi-
hat, then while strongly pulling the clamp
downward, secure it with the tuning key.
fig.Bottom-04.e
* Not pulling strongly enough on the clamp can make the bottom
hi-hat unstable, causing it to shake or turn, and prevent proper
functioning.
* After extended use of the hi-hat stand, the stand’s felt (or
rubber) pad on which the bottom cymbal rests becomes
compressed, which may cause the bottom hi-hat to become
unstable. If this occurs, loosen the clamp bolt and perform Step
7
again.
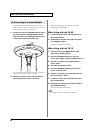
1.
Place the top hi-hat assembly on the hi-hat
stand with the cymbal rod passing through the
top hi-hat hole.
At this point, position the “Roland” logo on the farther
side, as viewed from the performer.
2.
Use the link cable to connect the bottom hi-hat
and the top hi-hat LINK jacks.
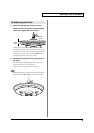
3.
Pull the bend of the cable softly with your
fingers.
fig.LinkCable
* Make sure that both the top hi-hat and bottom hi-hat can be
closed smoothly.
Slightly tighten
Pull down
and tighten
(3) Assembling the Overall Unit
VH-12_e 7ページ 2005年10月5日 水曜日 午前10時26分