


12
Once the connections have been completed, turn on power to your various devices in the order specified. By
turning on devices in the wrong order, you risk causing malfunction and/or damage to speakers and other
devices.
3.
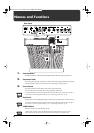
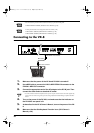
Turn on the power of the PK-25A, and make sure that the indicator on
the PK-25A’s rear panel is lit.
4.
Turn on the power to the external MIDI device according to the
instructions in the owner’s manual for the device.
5.
Set the PK-25A’s MIDI channel.
→
“Setting the MIDI Channel” (Next section)
6.
Set the MIDI channel on the external MIDI device to match the channel
set for the PK-25A.
7.
Play the pedal keyboard. If the pedal part is heard from the VK-8,
connections are complete.
Turn off the power of the PK-25A after turning off the power of the external MIDI device.
Setting the MIDI Channel
When connecting the PK-25A to external MIDI devices other than the VK-88 or VK-8, set
the PK-25A’s MIDI channel and the MIDI channel on the external MIDI device to the
same channel.
1.
Turn the MIDI CH (MIDI Channel Switching) knob on the PK-25A’s rear
panel to switch the MIDI channel.
Setting the MIDI channel is unnecessary when the PK-25A is connected to a VK-88 or VK-8.
Changing the Pitch (Octave Shift)
You can change the pitch in octave increments, allowing you to match the pitch to that
of the connected device.
1.
Switch the Octave Shift setting with the OCT SHIFT (Octave Shift)
switch on the PK-25A’s rear panel.
Set the switch to the “+1” position to raise the pitch one octave or to the “-1” position to
lower the pitch one octave.
If connecting the PK-25A to a VK-88 or VK-8, set the OCT SHIFT (Octave Shift) switch to the “0”
position.
NOTE
NOTE
MEMO
MEMO
PK-25A_e 12 ページ 2005年11月17日 木曜日 午前10時20分