


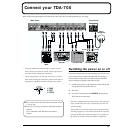

8
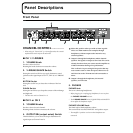
Panel Descriptions
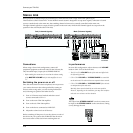
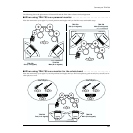
Front Panel
fig.20
CHANNEL CONTROL .............
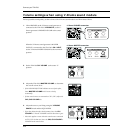
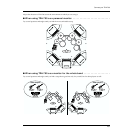
* When using in “Stereo Link” (p. 14) configuration, the controls
explained here work only on the main unit.
●
CH 1/V-DRUMS
1. VOLUME Knob
Sets the volume for CH1.
Rotating the knob clockwise increases the volume.
2. V-DRUMS SHAPE Switch
Setting this switch to ON lets you apply distinctive sound
qualities to the signal input to CH 1 L, CH 1 R, or V-DRUMS
IN.
BOTTOM Switch
Setting this to ON lets you boost the vividness of the low
end.
PUNCH Switch
Setting this to ON lets you shape the contour of the midrange
and high-end.
* This does not work on Channel 2 or 3.
●
CH 2 or CH 3
3. VOLUME Knobs
Sets the volume for each channel.
Rotating a knob clockwise increases the volume.
4. OUTPUT SEL (output select) Switch
This knob allows you to select the output destination for
signals input to Channel 2 and 3.
:
Select this position when you wish to listen to guide
clicks or a drum machine (for example) through
headphones, without output to the internal or any
external speakers.
A:
Output is through the headphones and the internal
speakers. No signals are output to Line Out. This can be
a handy function when you want to use the amplifier as
a fold back monitor during a live performance.
This is effective in preventing the loop noise that may
occur at times such as when the input (Channel 2 or 3)
and Line Out on the TDA-700 are both connected to a
mixer.
B:
Output is through the headphones, the internal
speakers, and Line Out.
5. PHONES
PHONES Jack
This is for connecting headphones.
* Before plugging in or unplugging headphones, be sure to place
the
PHONES VOLUME
knob at 0.
* The
V-DRUMS SHAPE
Switch, EQUALIZER, and MASTER
do not affect the headphone output.
PHONES VOLUME Knob
This knob adjusts the headphone volume.
This control does not affect LINE OUT and speaker output.
* The amplifier’s speakers work even when headphones are
connected.
81 92 5 76
4
3