


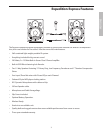
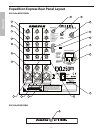
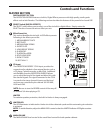
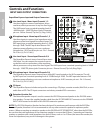

EXL250m REAR PANEL
1 HIGH FREQUENCY - Controls the high band of the
Channel Equalizer, +/- 15 dB at 12KHz.
2
LOW FREQUENCY - Controls the low band of the
Channel Equalizer, +/- 15 dB at 80Hz.
3
REVERB – Effect send connected to the internal
effect processor.
4 PAN – Controls the channel’s position between left
and right in the stereo bus.
5 VOLUME CONTROL – Provides smooth control over
level changes.
6 LINE – Line Input connector on the mono chan-
nels.
7 MIC- XLR connector for low impedance micro-
phone input. 24 volt phantom power is supplied.
8 BALANCE- Controls the left and right placement of
the stereo signal in the main mix output
9 CH 3/4 LINE IN – Stereo Line Input TRS connection
Tip=Left, Ring=Right, Sleeve=Ground.
10 CH 3/4 MIC IN - XLR connector for low impedance
microphone input.
11 SCRIBE STRIP - Use grease pencil or place tape
here to label channels.
12 POWER – Switches on the EXPEDITION EXPRESS’
main power.
13 AC VOLTAGE SWITCH – Selects the operating
voltage. Make sure this switch is set correctly
for the country you are in before turning on the
EXL250m.
14 AC POWER INLET – Connect External AC power
supply here.
15 LIMITER LED - Lights whenever the built-in
Limiteris active. If you see this lighting frequent-
ly, it means you’re overloading the EXL250m.
Turn down one or more of the channel Volume
controls or the Main Volume control.
16 CD INPUTS – Connect a CD, DAT, Cassette or
Mini Disk here.
17 SPEAKER OUT – Connect EXL250e external
speaker here.
18 MAIN VOLUME- Used to control the overall vol-
ume of the Left and Right main Mix outputs.
19 DSP EFFECTS - Used to switch between the 6 pre-
sets of the internal DSP effects processor.
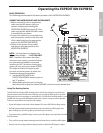
Expedition Express Rear Panel Layout
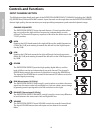
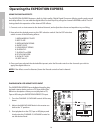
EXL250e REAR PANEL
A SPEAKER INPUT – Connect speaker cable from
EXL250m SPEAKER OUT here
ENGLISH
7