


4
Before using your bench mixer
Beforeusingyourbenchmixerforthefirst
time,removeanypackagingmaterialand
promotionallabelsortags.Itisrecommended
towashthemixingbowls,beaters,whisks
anddoughhooksinwarmsoapywaterwitha
softcloth.Rinseanddrythoroughly.
Set-up
Beforeassemblingyourbenchmixer,besure
thepowercordisunpluggedfromthepower
outletandthespeedcontroldialisinthe
'Off'position.Positionthebenchmixerona
level,drysurfacesuchasabenchtop.
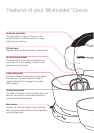
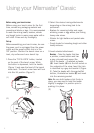
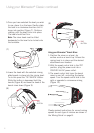
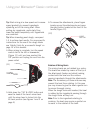
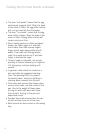
1.Pressthe'TILT&LOCK'button,located
ontheneckofthebenchmixer.While
thebuttonisdepressed,holdthehandle
(Figure1)andeasetheheadofthebench
mixerback.Thebenchmixerheadwilllock
intothistiltposition(Figure2).
2.Selectthedesiredmixingattachments
dependingonthemixingtasktobe
performed:
–Beatersforcreamingbutterandsugar,
whiskingcreamoreggwhitesplusmixing
heavycakemixes.
–Whisksforlightbattersandpacketcake
mixes.
–Doughhooksforkneadingdoughandother
heavymixtures.
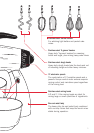
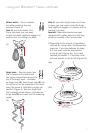
3.Insertselectedattachment:
Beaters–Takethebeaterthathas
apointier,curvedbottomandhas
agreycolouredbandaroundthe
topofthebeater–illustratedasbeater
(A).Insertbeater(A)intotheleftsocketon
theundersideofthemixerhead,thehole
isidentifiedbyagreydotbesideit(Figure
3).Takethebeaterwiththeangular/flat
bottom,illustratedasbeater(B)andinsert
intotheremainingsocket.
Note:Besurebothbeatersclickfirmlyin
place,youmayneedtotwistthebeater
slightlytoengageitinpositionpriorto
pushingitinplace.
Using your Mixmaster
®
Classic
(3)
TILT
BUTTON
(1)
(2)
A B