


6 TASCAM VL-A's
ENGLISH
Installation
The speaker placement is important to monitor correct
sound.
To get best performance of the speaker system, please fol-
low the instruction explained below.
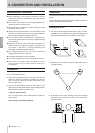
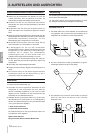
Installing the VL-A’s
1.
The unit should be placed at least 60 cm (100 cm recom-
mended) away from obstacle to the rear and at least 40 cm
(60 cm recommended) from any obstacle on either side.
2 Basically, two units and the listener should align to form
a regular triangle.
3. The height of units, more precisely, the top of the woofer
should come up to where your ears are in normal listen-
ing environment.
2-CONNECTION AND INSTALLATION
Precautions for Connection
– When unpacking, do not grab by the front of the unit
where the drivers are mounted as this may result in dam-
age to the cone.
– Turn off the power switch on the rear panel before con-
necting the power cord to the unit.
– Be sure that the connection is made securely to avoid
accidental disconnection.
– Adjust the input signal levels on your audio device to the
minimum or zero before turning on the power on the rear
panel to prevent possible damage to the unit.
– Do not use the system continuously for long periods of
time at high volume levels to avoid any possible damage
to your hearing.
– Depending on the TV monitor used with the system, the
speaker system may affect the quality of the picture on
the monitor. In this case, try various positions to find
best place to install the speaker system.
– The voltage supplied to the unit should match the
voltage as printed on the rear panel.
– Use audio cables that are free of damage.
– Do not send signals other than audio signals to the unit.
– The polarity of an audio cable connected to the unit
should match the pin assignments explained in
“Connection.”
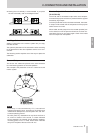
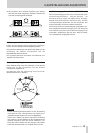
Connection
1. Turn off the power switch.
2. Connect the supplied power cord to the main unit and
make sure the plug is inserted completely to prevent it
from coming off. Connect the other end of the power
cord to an AC outlet.
3.
Connect the XLR balanced cable or TRS cable to your
audio system to send audio signals. The pin assignments of
the XLR balanced cable are shown below.
1: Ground, 2: Hot, 3: Cold
The pin assignments of the TRS balanced cable are
shown below.
Tip: Hot, Ring: Cold, Sleeve: Ground