


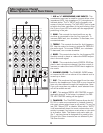


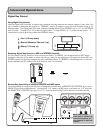

10
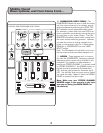
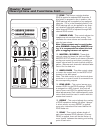
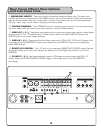
Middle Panel
Descriptions and Functions
1. VIDEO SELECT toggle - Holding this switch
in the CROSSFADER position for a second,
toggles video selection options between either
CROSSFADER activation and MANUAL. When in
CROSSFADER mode, the LED above CROSSFAD-
ER VIDEO TOGGLE will illuminate blue. This indi-
cates that video ouput signal is recieved from the
two assigned sources in the crossfader ASSIGN
selections. You can alternate between any two of
the three source inputs by pushing the crossfad-
er either to the far left or far right. As you shift
the crossfader in either direction, you will see
the respective VIDEO 1, 2, or 3 LEDs above the
SOURCE toggles illuminate.
In MANUAL mode, the CROSSFADER VIDEO TOG-
GLE LED is not illuminated, indicating that you can
manually shift between the VIDEO LEDs by simply
pushing the VIDEO SELECT toggle in the MANUAL
postion repeatedly to cycle through VIDEO 1 (red
LED), 2 (green LED) and 3 (yellow LED).
2. STEREO CHANNEL SOURCE toggle - This
switch will toggle between AV, PHONO/LINE and
CD sources connected to that channel. As stated
above, if you have both a CD+G player and a turn-
table connected to the same channel, only that
device to which this SOURCE TOGGLE is selected
would be audible. Applicable graphics/video sig-
nals are output accordingly.
3. SIGNAL light - This light illuminates blue when
a signal is recieved to STEREO CHANNEL 1, 2 or
3.
4. GAIN - This knob controls the input level from
that channel’s selected source. To increase the
GAIN, turn clockwise.
Note: Adjusting this knob is not synonymous to
adjusting the channel fader. The gain knob adjusts
the input level from the source, while the channel
fader adjusts the output level from the source.
For best audio results, adjust GAIN until just be-
fore distortion is noticeable.
5. VOCAL PARTNER/MULTIPLEX FUNCTION
& VOCAL ELMINATOR
VOCAL PARTNER/MULTIPLEX
- This feature
can alternately remove and activate “guide” or
“lead” vocals with compatible Multiplex media.
On this type of media, music and lead vocals are
panned hard left and right.
With the first press of this button, the red MULTIPLEX
LED is lit, indicating that lead vocals have been re-
moved, a feature also known as VOCAL CANCEL. The
channel with music only is duplicated so it is heard in
both left and right channels. Some backing vocals will
remain if there is overlap in the way they are recorded.
Pressed two more times, this button will illuminate the
yellow LED to indicate VOCAL PARTNER and guide vo-
cals will be activated.
VOCAL ELIMINATOR
- Press the button until the
center, green LED illuminates. With standard record-
ings, you will be able to partially remove lead vocals to
turn any recording into a Karaoke performance or for
remixing possibilities. To return to regular disc playback,
press this button until all three LEDs are unlit.
6. DIGITAL KEY CONTROL - Key Control allows you to
modify the original key of a track without changing its
tempo to match the natural range of your voice. You
can raise or lower your source music a total of 11
steps, or half note increments from its “natural” key. To
step DOWN or “flat (b)” the key, press the left button.
To step UP or “sharp (#)” the key, press the right but-
ton. To revert back to the original/natural key press the
middle NORMAL button.
Note: Key changes are only cueable when Master cueing.
7. CHANNEL FADER - Each fader raises and lowers
the volume of the corresponding STEREO 1, 2 or 3
channel as it is moved up or down.
8. CUE - This monitors the input signal from the mix
board to the headphones. Press CUE to hear that chan-
nel through the headphones. Note: If you cue more than
one channel, those channels will be audible as well.
9. KEY - This assigns DIGITAL KEY CONTROL to the
channel. If the button is pressed, DIGITAL KEY CON-
TROL will be applied to that channel.