


82
1
Note: We do not recommend attempting to assemble the
Clavinova alone. The job can be easily accomplished, how-
ever, with only two people.
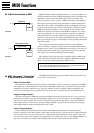
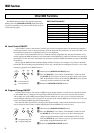
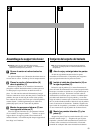
Z Open the box and remove all the parts.
On opening the box you should find the parts shown in
the illustration. Check to make sure that all the required
parts are provided.
X
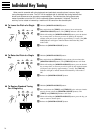
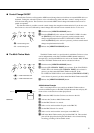
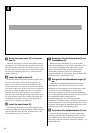
Install the power cord (H) in the pedal
box (C).
Invert the pedal box (C) and firmly insert the power cord
plate into the slot provided until it clicks into place. The
short end of the power cord (the end that connects to the
main unit) should be inside the pedal box, and the long end
of the cord (the end that connects to the AC power socket)
should extend from the side of the pedal box as shown in
the illustration. Also make sure that the pedal cable (al-
ready installed) extends from the other end of the pedal
box in the same way.
C
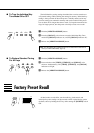
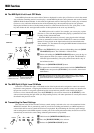
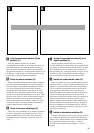
Assemble the side panels (E) and feet
(F).
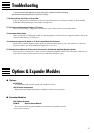
Secure the feet (F) to the side panels (E) with the long
gold-colored screws 1. Make sure that the left and right
feet are facing in the proper direction as shown in the illus-
tration. The grooved edge of each foot should face inward.
Keyboard Stand Assembly
Hinweis: Wir raten davon ab, das Clavinova alleine
zusammenzubauen und aufzustellen. Zwei Personen können
diese Arbeit jedoch problemlos ausführen.
Z
Öffnen Sie den Karton und nehmen Sie
alle Teile heraus.
Im Karton sollten die oben abgebildeten Teile enthalten
sein. Prüfen Sie zunächst bitte, ob alle Teile vollständig
vorhanden sind.
X
Sichern Sie das Netzkabel (H) in der
Rückwand des Pedalkastens (C).
Stellen Sie den Pedalkasten (C) auf den Kopf, und
stecken Sie die Netzkabeldurchführung fest in den dafür
vorgesehenen Schlitz, so daß sie mit einem Klicken
einrastet. Das kürzere Ende des Netzkabels (mit dem
kleineren Stecker) wird durch den Pedalkasten verlegt,
während das längere Ende (mit dem Netzstecker)
außerhalb liegt, wie in der Abbildung gezeigt. Führen Sie
außerdem das Pedalkabel (bereits angeschlossen) an der
anderen Seite aus dem Pedalkasten.
C
Schrauben Sie die Seitenwände (E) und
die Füße (F) zusammen.
Machen Sie die Füße (F) mit den langen goldenen
Schrauben 1 an den Seitenwänden fest. Achten Sie
darauf, daß die Füße richtig herum angeschraubt werden,
wie in der Abbildung gezeigt. Die genutete Kante der Füße
muß nach innen weisen.
Zusammenbau und Aufstellung