


22 Basic operation
EMX5000-20/EMX5000-12—Owner’s Manual
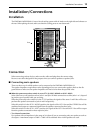
Basic operation
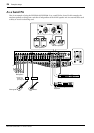
Connecting microphones
and instruments
1 Before connecting mics or instruments,
make sure that the power of all equip-
ment (where applicable) is turned off.
Also make sure that each channel fader
and the faders in the master section are
turned down. Check to see if the Power
amp select switch on the control panel is
set to ST L-R.
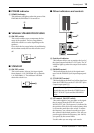
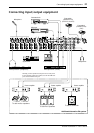
2 Connect cables to your mics and instru-
ment, and insert the other end of the
cables firmly into the appropriate INPUT
A/B jacks (EMX5000-20: channels 1–16,
EMX5000-12: channels 1–8) or the 17L/
18R, 19L/20R (EMX5000-20), 9L/10R,
11L/12R (EMX5000-12) jacks.
3 Turn on the power to the peripheral
devices, then turn on the power to the
EMX5000-20/EMX5000-12.
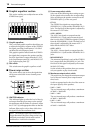
4 While speaking into the mic (or while
playing the instrument), adjust the chan-
nel GAIN control so that the channel
PEAK indicator lights occasionally at the
maximum volume.
5 Raise the ST OUT fader in the master sec-
tion to the “10” position, and while
speaking into the mic (or while playing
the instrument), adjust the channel fader
so that the 0 LED of the peak level indica-
tor lights occasionally. Use the LEVEL con-
trol to adjust the maximum level of the
speakers.
6 If you wish to adjust the tone of each
channel, rotate the equalizer controls as
desired.
7 Use the graphic equalizer and the ST
fader in the master section to adjust the
overall volume and tone.
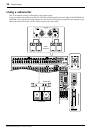
Using the digital effect
The EMX5000-20/EMX5000-12 has a built-in
digital effect, allowing reverberation or ambiance
to be added to vocals or instrumental sounds.
1 Connect a mic or instrument to the
desired channels, and adjust the volume
and tone.
2 Press the ON switch of the digital effect
section.
3 Use the PROGRAM selector to select the
type of effect you wish to apply.
4 Raise the EFF 1 (or EFF 2) control of the
channels to which you wish to apply the
digital effect.
5 Use the EFFECT 1 (or EFFECT 2) RTN fader
of the digital effect section to adjust the
level of the effect sound.
6 Adjust the PARAMETER control of the dig-
ital effect section to the desired level.
Note: You cannot use channel 1–16
(EMX5000-20), 1–8 (EMX5000-12) INPUT A
and B jacks at the same time.
Note: When turning the power off, reverse this
sequence.
Note: The volume level is affected by the set-
tings of the channel equalizers and the graphic
equalizer. When you set the equalizers, check
the peak level indicator and adjust the ST fader
if necessary.
Note: You can send the effect sound to the
AUX 1/2 bus by raising the AUX 1/2 control in
the digital effect section. If the effect sound is
distorted even though the ST control and the
AUX 1/2 controls in the digital effect section
are turned all the way down, lower the EFF 1
(or EFF 2) controls of the digital effect section.
Note: The setting of the AUX 1/2 fader in the
master section does not affect the internal ef-
fect.