


7
An Example of the Multi Part
Editor in Use
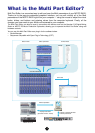
There is no single way to use the many components of the Multi Part Editor. Your editing needs
and preferences may differ; however, the following example gives you a simple step-by-step guide
in how to use the Multi Part Editor. The Part Mixer window is the first window to open, so that’s
where the explanation begins.
n
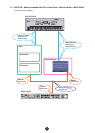
Before using the Multi Part Editor, you need to set the mode of the MOTIF-RACK to the Multi mode.
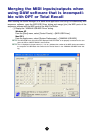
1. Click “Setup” under “Setup” in the menu bar to open the Setup dialog.
Configure the parameters in this window to enable communication between Multi Part Edi-
tor and MOTIF-RACK. For further information, see page 31.
n
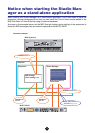
When using DAW software that is incompatible with OPT or Total Recall:
When starting the Studio Manager as a stand-alone application and using it simultaneously with
sequencer software, open the MIDI-USB Driver dialog and merge (join) the MIDI ports of the sequencer
software with the MIDI ports of the Multi Part Editor (page 9).
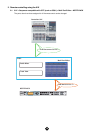
2. Transfer the desired User Voices from the MOTIF-RACK (page 33) or open a Voice Editor
file (page 17) with the Multi Part Editor.
n
Once User Voices are updated in the Multi Part Editor, they can be used the next time Multi Part Editor
is started. If new voices are created or edited with the MOTIF-RACK or Voice Editor, the user voices
must again be updated by transferring them from the MOTIF-RACK or opening a Voice Editor file.
n
If you don’t intend to use User Voices in the Multi, you can skip this step.
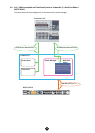
3. Transfer the desired Multi from the MOTIF-RACK into the Multi Part Editor. For more infor-
mation, see “Receive Multi Bulk” on page 19.
n
If you intend to use a default Multi, you can skip this step. In this case, transmit the Multi (page 18) in
order to synchronize the data in the Multi Part Editor and MOTIF-RACK.
(1) Select the Multi data you want to send to the Multi Part Editor on the MOTIF-RACK.
(2) Select “Receive Multi Bulk” under “Setup” in the menu bar.
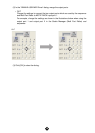
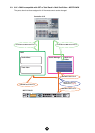
4. Select a voice for each part.
(1) Click on the voice name or bank name for each part to display the “Voice List”.
(2) Select the voice you want to assign to the part.
5. Set parameters for each part in the Part Mixer window.
Click the [DETAIL] button for each part and for the Common Section to make further set-
tings.
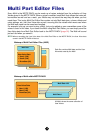
6. Save your edited data by clicking the [Save] button in the toolbar.
You can save a Multi for each of your songs. When you want to play a song, open the Multi
Part Editor file (*.M5E) corresponding to the song. It will automatically be transmitted to the
MOTIF-RACK. No further settings are necessary.
Additionally, when running Multi Part Editor as a plug-in under a OPT-compatible host appli-
cation such as SQ01, you can save your Multi Part Editor data as part of the host applica-
tion’s song data.
• When starting the Multi Part Editor from the Studio Manager, you can save the Multi Part Editor
data into the Session file of Studio Manager.
• When using DAW (digital audio workstation) software compatible with Total Recall and the Studio
Manager together, the Multi Part Editor data will be saved into the Project file (Song file) of the
DAW.