


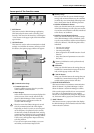

USB MIDI Driver
17
USB MIDI Driver
If you are connecting the console/engine to a USB port on your PC, you’ll need to install the Yamaha USB
driver. If this driver is already installed, or if you will be using a serial connection (RS-232-C connector), you
do not need to install the USB driver.
The procedure for installing the Yamaha USB driver
depends on the version of Windows that you are using.
• Windows 98 & 98SE, see page 17
• Windows Me, see page 18
• Windows 2000, see page 18
• Windows XP, see page 19
Windows 95 and NT 4.0 do not support USB.
Please use a serial connection.
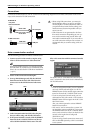
Windows 98 & 98SE
1. Start your PC and Windows, and insert the
included CD-ROM into your PC’s CD-ROM drive.
2. Power-off the console/engine, and use a USB cable
to connect the console/engine to the PC.
The USB connector of the console/engine is located
in the PC CONTROL section of the rear panel.
3. Turn on the console/engine.
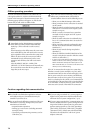
The Add New Hardware Wizard appears. If it doesn’t
appear, try disconnecting and reconnecting the USB
cable. Alternatively, open the Add New Hardware
control panel.
4. Click Next.
The following window appears.
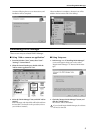
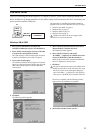
5. Select “Search for the best driver for your device
(Recommended),” and then click Next.
The following window appears.
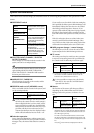
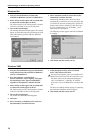
6. Select “Specify a location,” and specify
“D:\USBdrv_” (replacing “D” with the drive letter
of your CD-ROM drive), and then click Next.
When the driver is located, “YAMAHA USB MIDI
Driver” is displayed, as shown below.
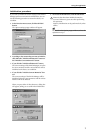
7. Click Next.
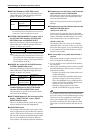
You may be prompted to insert your Windows CD-
ROM. Do not insert it! Click OK, and in the “Copy
files from” section of the subsequent dialog box,
enter “D:\USBdrv_” (replacing “D” with the drive
letter of your CD-ROM drive), and then click OK.
The driver is installed, and the following window
appears when the installation is complete.
8. Click Finish, and then restart your PC.
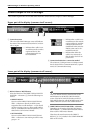
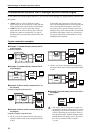
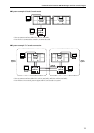
PC
Driver
PM1D
Manager
CS1D/DSP1D
USB cable