


29
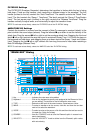
8 FINE................................Use the “FINE” knob to further fine-tune it.
9 CUTOFF .........................Use the “CUTOFF” knob to set its LPF Cutoff Frequency.
0 VELOCITY......................Use the “VELOCITY” knob to define how the Element’s filter opens/
closes in response to note velocity.
A RESO..............................Use the “RESO” knob to set the LPF Resonance level.
B HPF.................................Use the “HPF” knob to set the HPF Frequency.
C AMPLITUDE VELOCITY.Use the “VELOCITY” knob to define how the Element’s output level
varies with note velocity.
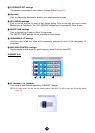
D RECEIVE NOTE .............Click on the text box and select whether or not to receive notes.
E KEY ASSIGN..................Click on the text box and select Single key assignment or Multi key
assignment.
F ALTERNATE GROUP .....Click on the text box and select an alternate group number. This is
used to prevent a pair of drum sounds from sounding simultaneously
(for example, an open and closed hi-hat).
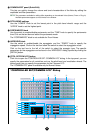
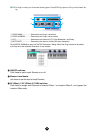
G FILTER............................Drag one of the handles horizontally to adjust the Element’s “HPF Cut-
off Frequency.” Drag the other handle vertically to adjust its “LPF Res-
onance,” and horizontally to adjust its “LPF Cutoff Frequency.”
n To set these values directly, select the “OSCILLATOR” tab of the DRUM KEY DETAIL Dialog.
H AMPLITUDE EG.............Drag the first handle (furthest to the left) horizontally to adjust the Ele-
ment’s “Attack Time.” Drag the second horizontally to adjust its “Decay
1 Time,” and vertically to adjust its “Decay 1 Level.” Drag the last han-
dle (furthest to the right) horizontally to adjust its “Decay 2 Time.”
n To set these values directly, select the “PARAMETER” tab of the DRUM KEY DETAIL Dialog.
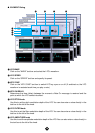
I EQ...................................Click on the text box and select the EQ type. With the “EQ L/H” and
“P.EQ” types, you can adjust some EQ parameters using the handles
in the graphs. Drag one of the handles horizontally to adjust the Ele-
ment’s “EQ Low Frequency,” and vertically to adjust its “EQ Low Gain.”
Drag the other handle horizontally to adjust the Element’s “EQ High
Frequency” (or “EQ Resonance” if the P.EQ type has been chosen)
and vertically to adjust its “EQ High Gain.”
n To set these values directly, select the “OSCILLATOR” tab of the DRUM KEY DETAIL Dialog.
J LEVEL.............................Use this knob to set the level of the Element.
K PAN .................................Use this knob to set the stereo position of the Element.
L RNDM PAN.....................Use this knob to set the Element’s “Random Pan” depth.
M ALTER PAN.....................Use this knob to set the “Alternate Pan” depth.
N Output Assignment
selector ...........................Click on the text box and select the output(s) to which the Element will
be sent.
O EF1/EF2/THRU...............Click the [EF 1] switch to pass the signal through Insertion Effect 1.
Click [EF 2] to pass it through Insertion Effect 2. Click [THRU] to
bypass the Insertion Effects.
P REVERB.........................Use the “REVERB” knob to set the level of the by-passed signal sent
to the Reverb unit.
Q CHORUS ........................Use the “CHORUS” knob to set the level of the by-passed signal sent
to the CHORUS unit.
R DETAIL............................Click this to open the “DRUM KEY DETAIL” dialog and input all Ele-
ment values directly (except the Keyboard note assignment).
n The signal output from EQ is sent to LEVEL at the left bottom of the Drum Key Dialog.
n If the OSCILLATOR TYPE is set to “Voice,” parameters 7, 9 -14, 16 -19, 22, 23, 26, and 27 described
above are not available.