


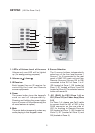
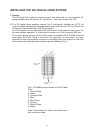
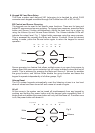


Step-by-Step Crimping instructions
Step1 Stripa2to3inches portion of the insulation, exposing the 4 twisted pairs.
Step2 Untwist the wires and fan them out individually. Arrange the wires into the
correct color scheme as shown in Fig.1
Step3 Flatten the wires in their correct order, and trim them evenly across the top.
Most crimp tools have a wire trimmer built-in. It is best to trim the wires to
about 1/2 in length.
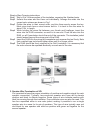
Step4 While holding the wires flat between your thumb and forefinger, insert the
wires into the RJ45 connector, so each is its own slot. Push the wire into the
RJ45, so all 8 conductors touch the end of the connector. The insulation jacket
should extend beyond the crimp point of the RJ45.
Step5 Insert the RJ45 into the crimp tool receptacle and squeeze the tool firmly. Note
that a ratchet type tool should tighten down until it no longer clicks.
Step6 The RJ45 should be firmly crimped to the Cat-5 insulation. It is necessary that
the color scheme be repeated identically on each end of the wire.
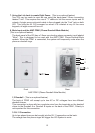
3. Speaker Wire Termination at XOi
It is important to keep the proper orientation of positive and negative signal for each
speaker connection. Typically, two-conductor speaker wire uses red to denote
positive and black to denote negative. Some types of wire indicate positive with
dark line running through the insulation. Four-conductor wire can also be used. This
has four separated wires in one outer jacket, making it possible to run a single
speaker wire to a zone for its pair of speakers. This type of wire typically uses red
and black for one speaker and white as positive and green as negative for the
second speaker.
9