


COMMANDER PLUS™ CONTROLS AND FUNCTIONS
©American Audio® - www.americandj.com - Commander Plus™ Instruction Manual Page 11
two respectively. When the crossfader is set in the center position, the output signals of both the chan-
nels one and channels two will be even.
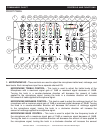
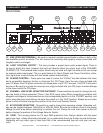
10. CHANNEL VOLUME FADER - These faders are used to control the output signal of any source
assigned to its particular channel. However, master volume is controlled by the MASTER VOLUME
CONTROL (26).
11. BEAT INDICATOR - The beat indicator LED’s flash at every bass beat of the respective source.
This function is used to visually reference a tracks BPMs. This function works in conjunction with the
CROSSFADER (9), if the CROSSFADER (9) is not activated the beat indicator will not function. The
beat indicators directly refer to any signal source assigned to the CROSSFADER (9). Use the BPM’s
indicator to beat sync to tracks together, as soon as the LEDs blink synchronously, the speed of the
two sources is synchronized.
12. CUE MIXING CONTROL - This functions allows you to monitor the Cue level as well as the
Program (main output) level in your headphones. A channels Cue Level may only be monitored if the
channels PFL (8) function is selected. To select a channels cue function press the PFL BUTTON (8)
that is directly associated with the specific channel you wish to monitor. You may use the mixing func-
tion to blend both the Cue level and the Program level together. You can vary the output level to either
hear more or less of either of the two levels. Sliding the Cue Mixing fader to the CUE position (left) will
allow you to hear more of the Cue level. Sliding the knob to the PGM position (right) will allow you to
hear more of the Program level (main output). You may also use the Cue Mixing Control to hear either
the Cue level or the Program level exclusively. If the fader is in the full CUE position you will only hear
the cue level, if the fader is in the full PGM position you will only hear the main output. This function is
especially useful when mixing without an monitor.
13. SPLIT CUE - This button will activate the "Split Cue" function. When used with a set of stereo
headphones, the Split Cue function will assign the Cue signal to the left channel of the headphones
and the Program (main output) signal to the right channel of the headphones. Essentially splitting the
cue signal in half. This process will allow for headphones mixing. The CUE MIXING CONTROL (12) will
also work in conjunction with function. Please note that this function will only work with a set of stereo
headphones.
14. CUE LEVEL VOLUME CONTROL - This knob is used to adjusts the headphone volume output
level. Turn the knob in a clockwise direction to increase the headphone volume.
15. HEADPHONE JACK - This jack is used to connect your headphones to the mixer allowing you to
monitor the cue source. Use headphones only rated at 8 ohms to 32 ohms. Most DJ headphones are
rated at 16 ohm, these are highly recommended. Always be sure the CUE LEVEL VOLUME (14) is set
to minimum before you put the headphones on.
16. ZONE 2 ASSIGN - This function switch allows you to select an independent channel output for
Zone 2. You may select any of the 4 channels or master output (PGM). This allows you to use one
mixer to control two separate outputs in two different areas.
17. ZONE 1 EQ CONTROLS -
ZONE 1 TREBLE CONTROL - This knob is used to adjust the treble levels of ZONE 1 allow-
ing for a maximum treble gain of 15dB or maximum decrease of -30dB. Turning the knob in
a counter-clockwise direction will decrease the amount of treble applied to the ZONE 1 signal,
turning the knob in a clockwise direction will increase the amount of treble applied to
the ZONE 1 signal.