


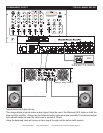

COMMANDER PLUS™ CONTROLS AND FUNCTIONS
©American Audio® - www.americandj.com - Commander Plus™ Instruction Manual Page 15
90,11,12
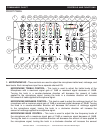
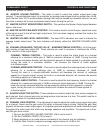
REAR PANEL
PLUSRP
DIRK ELECTRONIC CORPORATION
SHU
P,F YUEN
1/1
LINE 3
LINE 3
PHONO 3
PHONO 3
LINE 5
LINE 5
LINE 4
LINE 4
LINE 2
LINE 2
CH-1
CH-1
CH-2
CH-2
CH-3
CH-3
MASTER
MASTER
REC
REC
ZONE 1
ZONE 1
OUTPUT
OUTPUT
GND
GND
AC INPUT 115/230V
AC INPUT 115/230V
FUSE 0.5A,F,250V
FUSE 0.5A,F,250V
CAUTION:
CAUTION:
ATTENTION:
ATTENTION:
DISCONNECT SUPPLY CORD
DISCONNECT SUPPLY CORD
BEFORE CHANGING FUSE.
BEFORE CHANGING FUSE.
DEBRANCHER AVANT DE
DEBRANCHER AVANT DE
REMPLACER LE FUSIBLE.
REMPLACER LE FUSIBLE.
CAUTION:
CAUTION:
ATTENTION:
ATTENTION:
TO REDUCE THE RISK OF FIRE,
TO REDUCE THE RISK OF FIRE,
REPLACE ONLY WITH THE SAME
REPLACE ONLY WITH THE SAME
TYPE AND RATING OF FUSE.
TYPE AND RATING OF FUSE.
UTILISER UN FUSIBLE DE
UTILISER UN FUSIBLE DE
RECHANGE DE MEME TYPE.
RECHANGE DE MEME TYPE.
AMERICAN AUDIO
AMERICAN AUDIO
PREAMP MIXER
PREAMP MIXER
MODEL NO. COMMANDER PLUS
MODEL NO. COMMANDER PLUS
AC 115/230V ~ 50/60HZ 20W
AC 115/230V ~ 50/60HZ 20W
L
R
PAS OUVRIR.
PAS OUVRIR.
RISK OF ELECTRIC SHOCK
RISK OF ELECTRIC SHOCK
AVIS:RISQUE DE CHOC ELECTRIQUE-NE
AVIS:RISQUE DE CHOC ELECTRIQUE-NE
CAUTION
CAUTION
DO NOT OPEN
DO NOT OPEN
CH-4
CH-4
LINE 6
LINE 6
BALANCED OUTPUT
BALANCED OUTPUT
LEFT
LEFT
RIGHT
RIGHT
AUX 3
AUX 3
PHONO 2
PHONO 2
AUX 2
AUX 2
PHONO 1
PHONO 1
AUX 1
AUX 1
LINE 1
LINE 1
AUX 1
AUX 1
PHONO 1
PHONO 1
PHONO 2
PHONO 2
AUX 2
AUX 2
PHONO 3
PHONO 3
AUX 3
AUX 3
L
R
GND
GND
LIGHT CONTROL
LIGHT CONTROL
ZONE 2
ZONE 2
SEND
SEND
RECEIVE
RECEIVE
EFFECT
EFFECT
MIC 3
MIC 3
PLAYER CONTROL
PLAYER CONTROL
AB
41
44
38 40
37
42 43
45
46
47
4948
50
51
52
53
3739
FUSE
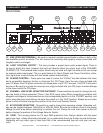
37. GND (GROUND TERMINAL) - Be sure to connect turntable ground leads to either or both of the
two available ground terminals. This will reduce the humming and popping noises associated with
magnetic phono cartridges.
38. LIGHT CONTROL OUTPUT - This jack provides a preset mono audio output signal. There is
no way to adjust this level, however this level will directly reflect the output level of the CHANNEL
SLIDERS (10). This buffered audio output should only be used with light controllers that can accept
an external audio input signal. This is a great feature for Touch Panels and Chase Controllers, allow-
ing a light show to synchronize with the sound system automatically.
39. PLAYER CONTROL - These jacks are used to control the “Q-Start” function between the mixer
and a compatible American Audio® or American DJ® CD Player. Input the mini plugs included with
your CD player from CD player controller into these jacks, input CD 1 into jack 1 and CD 2 into jack 2
and so on. Be sure to only use the mono tip mini plugs included with your CD player to avoid damage
to the mixer and/or the CD player.
40. CHANNEL LINE LEVEL SELECTOR SWITCHES - These switches are used to change the volt-
age line levels of there respected Phono / Aux RCA inputs jacks. When connecting turntables with
magnetic cartridges to these jacks be sure the corresponding switch is in the “PHONO” position, and
when using line level input devices be sure this switch is in the “AUX” position. Always be sure main
power is shut off before change the position of the Line Level Selector Switch.
41. AC VOLTAGE SELECTOR - This switch is used to change the operating voltage. Operating volt-
age can be toggled between 120v/50Hz or 220v/50~60Hz. Be sure the selector is set to the proper
voltage for your area before attempting to operate the unit. Always be sure main power is shut off
before change the position of the Voltage Selector Switch.
42. FUSE - This housing stores the 0.5 amp GMA protective fuse. Always replace with the exact
same type fuse, unless otherwise instructed, by an authorized American Audio® service technician.
Replacing with any other type of fuse than that of the recommended fuse will void your unit war-
ranty.
REAR PANEL