


DX4™ Controls and Features Cont.
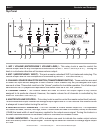
8. MAIN POWER SWITCH -
This is the main power ON/OFF button. A red LED below the power
switch will glow indicating main power is on. Before main power is applied, be sure you have made all
connections to the mixer. Also be sure your ampli er(s) is(are) turned off. Remember to avoid damag-
ing pops to your speakers, the mixer is turned on rst and turned off last.
9. MIC 2 VOLUME (MICROPHONE 2 VOLUME LEVEL) -
This rotary knob is used to control the
volume output level for any microphone connected to the
MIC 2 INPUT JACK
(30).
MIC 2 INPUT JACK (30).MIC 2 INPUT JACK
Turning the knob
in a clockwise direction will increase volume output.
10. CUE SELECTOR BUTTON -
These buttons are used to activate a channels “CUE” mode. A
red LED next to the Cue Selector Button will glow when a channels cue mode is activated. The Cue
function sends a channels incoming signal to the headphones. The cue volume level is adjusted by
the
CUE LEVEL KNOB (15)
.
Be sure the
CUE MIXING KNOB (14)
is in the “CUE” position to hear a
selected channel‘s source.
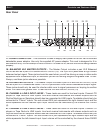
11. FADER ASSIGN SWITCH -
This is a five position switch that assigns a channel to the
CROSS-
FADER (12)
. When a channel is assigned to the left side of the
CROSSFADER (12)
that channels
output level is routed to and controlled by the
CROSSFADER (12)
. Sliding the
CROSSFADER (12)
to
left position will send the volume output of the assigned channel to the
MASTER VOLUME LEVEL (5)
,
siding the
CROSSFADER (12)
to right position will cut that channels volume to
MASTER VOLUME
LEVEL (5)
.
The reverse is true for the right channel fader assign switch. When the assign switch is set
to the "OFF" position the crossfader will have no function.
12. FEATHER FADER PLUS CROSSFADER
-
This fader is used to blend the output signals of any two
channels together. When the fader is in the full left position, the output signal of any channel assigned
to the left side of the fader will be controlled by the master volume level. The same fundamentals will
apply for any channel assigned to the right side of the fader. Sliding the fader from left position to the
right will vary the output signals of any two channels respectively. When the crossfader is set in the
center position, the output signals of both channels will be even.
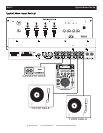
13. BOOTH LEVEL (BOOTH LEVEL VOLUME CONTROL) -
This rotary knob is used to control the
output volume to any source connect to the
BOOTH OUTPUT JACKS (25)
on the rear of the unit. Be
sure this volume control is always set to zero before turning the unit on and off.
14. CUE MIXING CONTROLLER -
This knob is used to select the monitoring source, either the master
output or a channel. The cue level is prefader and is not affected by a channel’s fader level. To moni-
tor the master output signal turn the knob to the “PGM” position to monitor a channel signal turn the
knob to the “CUE” position. To vary the amount of either signal turn the knob more or less to the center
position. If the knob is set to the center position, you can monitor both the cue and master output levels
equally.
15. CUE LEVEL VOLUME CONTROL -
This knob adjusts the headphone volume output level. Turning
the knob in clockwise direction will increase headphone volume output.
16. HEADPHONE JACK -
This jack is used to connect your headphones to the mixer allowing you to
monitor the cue source. Use headphones only rated at 8 ohms to 32 ohms. Most DJ headphones are
rated at 16 ohm, these are highly recommended. Always be sure the
CUE LEVEL VOLUME
(12) is set
to minimum before you put the headphones on.
©
American Audio
®
- www.americandj.com - DX4™ Instruction Manual Page 6