


Customer Support: American Audio® provides a toll free customer support line, to provide set up help and
to answer any question should you encounter problems during your set up or initial operation. You may also visit
us on the web at www.AmericanAudio.us for any comments or suggestions. For service related issue please
contact American Audio®. Service Hours are Monday through Friday 9:00 a.m. to 5:00 p.m. Pacic Standard
Time.
Voice: (800) 322-6337
Fax: (323) 582-2610
E-mail: support@AmericanAudio.us
Warning! To prevent or reduce the risk of electrical shock or re, do not expose this unit to rain or moisture.
Caution! There are no user serviceable parts inside this unit. Do not attempt any repairs yourself, doing so will
void your manufactures warranty. In the unlikely event your unit may require service please contact customer
support. Please do not return to your dealer without rst contacting customer support.
CUSTOMER SERVICE
©American Audio® - www.AmericanAudio.com - Q-2422/SX User Instructions page 5
American Audio would like to thank you for your purchase of this great product. For those of you that
are to impatient to read the entire user manual we have compiled these quick start instructions. We
hope that you will at least read through these instructions to familiarize yourself with the basic under-
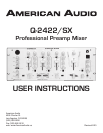
standing of the unit. The Q-2422/SX is part of American DJ’s continuing evolution in audio technol-
ogy. This unit has been built and designed with the typical DJ in mind, by DJ’s. We have attempted to
provide you with the most reliable product on the market by only using components made from quality
products.
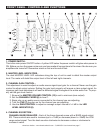
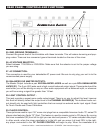
MASTER LEVEL - Use this level control to set your volume output. Try never to send an output of
more than +4dB to your system. A signal at levels higher than this will start to distort and may cause
damage to your system and speakers. Remember that a distorted signal from your mixer will only be
multiplied throughout your system.
CHANNEL TRIM LEVEL - The channel trim levels are not to be used as volume controls, never use
the channel trim to set the output volume. These controls are used to aid in distortion control. Use
this control to preset your signal level before the crossfader. With your channel fades in the maximum
position, use the channel trim level to set an average output level of about +4dB on you master level
meter.
HEADPHONES - To avoid sever hearing damage always be sure the headphone level is set to mini-
mum before plugging them in. Never put the headphones on without making sure the headphone level
is turned down.
MAIN MIC - The main mic connector uses a Nuetrik combo plug which allows you to connect either
a 1/4” unbalanced jack or by a standard 3-pin XLR balanced connector. The main mic also has an
independent volume control with separate high and low level adjustments. If feedback occurs when
using the mic, try lowering the “low” frequency level, this may reduce feedback. Always leave the mic
level to it’s minimum level when not in use.
PHONO/AUX/LINE SWITCH (5) - This switch is used to change the selected input from phono to line
and vice versa. Channels 1 and 2 may be switched PHONO/AUX or LINE. Channel 3 may be switched
LINE 3 or LINE 4. The selectors for AUX1/PHONO1 and AUX2/PHONO2 are on the rear panel (36).
QUICK START