©American DJ Supply® - www.americandj.com - Color 150/RG™ Instruction Manual Page 15
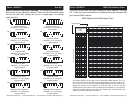
Color 150/RG™ Master/Slave Settings
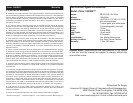
Color 150/RG™ DMX Traits
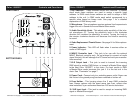
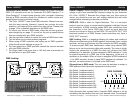
This chart details the Master/Slave dip switch setting for Master/Slave
configuration for four units. Use these dip switch setting when you will
be using two or more fixtures in a Master/Slave configuration. The
“Master - Head 1” settings should only be used once.
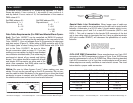
This chart below details the DMX traits of the fixture. The individual
trait can only be accessed an universal DMX controller. Note: The
Color 150/RG™ has a special DMX function
ON ON
ON ON
198765432 10
Head 4
198765432 10
Head 3
198765432 10
Head 2
19876543210
Master - Head 1
DMX CHANNEL
123
DIMMER COLOR GOBO
PURPLE 149-169
PINK 128-148
ORANGE 107-127
YELLOW 86-106
GREEN 65-85
BLUE 44-64
RED 23-43
WHITE 01-22
ROTATING GOBO 1
SPOT
128
ROTATING GOBO 2
255
0%
CLR SCROLL MED 181-212
CLR SCROLL SLW 170-180
CLR SCROLL FST 213-255
171
170
86
85
255
000
0
100%255
50%128
©American DJ Supply® - www.americandj.com - Color 150/RG™ Instruction Manual Page 16
Color 150/RG™ Cleaning
Color 150/RG™ Trouble Shooting
Fixture Cleaning:
Due to fog residue, smoke, and dust cleaning the internal and external
optical lenses and mirror should be carried out periodically to optimize
light output. Cleaning frequency depends on the environment in which
the fixture operates (I.e. smoke, fog residue, dust, dew). In heavy club
use we recommend cleaning on a monthly basis. Periodic cleaning will
ensure longevity, and crisp output.
1. Use normal glass cleaner and a soft cloth to wipe down the outside
casing.
2. Use a brush to wipe down the cooling vents and fan grill.
3. Clean the external lens with glass cleaner and a soft cloth every
20 days.
4. Clean the internal lens with glass cleaner and a soft cloth every
30-60 days.
5. Always be sure to dry all parts completely before plugging the unit
back in.
Trouble Shooting:
Listed below are a few common problems that you may encounter,
with solutions.
No light output from the unit;
1. Be sure you have connected your unit into a standard 120V wall
outlet.
2. Be sure the external fuse has not blown. The fuse is located on the
rear panel of the unit.
3. Remove the lamp cover and be sure the lamp is seated in its
socket properly. Occasionally lamps become loose during shipping
be sure the lamp is push in to its socket all the way.
4. Be sure the fuse holder is completely and properly seated.
Unit does not respond to sound;
1. Low frequencies (bass) should cause the unit to react to sound.
Tapping on the microphone, quiet or high pitched sounds may not
activate the unit.
2. Be sure the SENSITIVITY KNOB (3) is not set to the maximum
position.
3. Be sure the dip-switches are set for Stand-Alone mode.


