


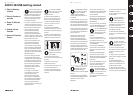


(EN) Step 3: Getting
started
(ES) Paso 3: Puesta en
marcha
(FR) Étape 3 : Mise en
œuvre
(DE) Schritt 3: Erste
Schritte
(PT) Passo 3: Primeiros
Passos
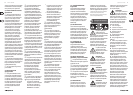
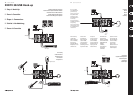
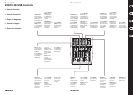
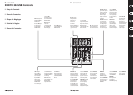
XENYX 302USB Getting started
(EN) Follow these steps to create
recordings on your computer:
•Connect a microphone to
the MIC IN and/or a stereo source to the
2-TRACK inputs. Connect headphones to
the PHONES jack
• Press the LINE/USB FROM button to select
USB PLAY
• Press the LINE/USB TO button to
selectPHONES
• Set the 2-TRACK TO button in the UP
position (MAINMIX)
• Connect the mixer to a free USB port with
the included USB cable. It will take a few
seconds for the computer to recognize
your device
• If using a Windows computer,
downloadthe BEHRINGER USB Audio
Driver from the Support section of
behringer.com to achieve low latency.
Alternatively, youmay use the free
ASIO4ALL driver. This will allow you to
monitor your recordings without hearing
a delay between the incoming and
outgoingsignals
• Select ‘USB Audio CODEC’ as the sound
card for both Input and Output in your
system audio settings
*Note* Make sure that no “software thru”
function is activated while recording.
(ES) Siga estos pasos para crear grabaciones
en su ordenador:
• Conecte un micrófono a la toma MIC
IN y/o una fuente stereo a las entradas
2-TRACK. Conecte unos auriculares a la
salida PHONES
• Pulse el botón LINE/USB FROM y elija la
posición USB PLAY
• Pulse el botón LINE/USB TO y elija la
posición PHONES
• Ajuste el botón 2-TRACK TO a la posición
de “no pulsado” (MAINMIX)
• Conecte este mezclador a un puerto
USB libre con el cable USB incluido.
Elordenador tardará unos segundos en
reconocer el nuevo dispositivo
• Si está usando un ordenador con sistema
operativo Windows, descárguese el driver
o controlador audio BEHRINGER USB
que encontrará en la sección Support de
nuestra página web en behringer.com
para conseguir así la mínima latencia
posible. Alternativamente, también
puede usar el driver gratuito ASIO4ALL.
Esto le permitirá monitorizar sus
grabaciones sin que haya retardo entre
las señales de entrada y salida
• Elija ‘USB Audio CODEC’ como la tarjeta
de sonido para tanto la entrada como
la salida en la conguración audio de
su sistema
*Nota* Asegúrese de no tener activa
ninguna función “software thru”
durantelagrabación.
(FR) Suivez ces étapes pour enregistrer sur
votre ordinateur :
• Connectez un micro à l’entrée MIC IN
et/ou une source stéréo aux entrées
2-TRACK. Connectez le casque à la
sortiePHONES
• Appuyez sur la touche LINE/USB FROM
etsélectionnez USB PLAY
• Appuyez sur la touche LINE/USB TO
etsélectionnez PHONES
• Placez la touche 2-TRACK TO en position
HAUTE (MAINMIX)
• Connectez la console à un port
USB libreavec le câble USB fourni.
L’ordinateur met quelques secondes à
détecter laconsole
• Si vous utilisez un ordinateur Windows,
téléchargez le pilote audio BEHRINGER
USB Audio dans la section Support du
site behringer.com pour obtenir une
latence faible. Sinon, utilisez le pilote
gratuit ASIO4ALL. Ceci vous permet
d’écouter vos enregistrements sans
délai dans l’écoute des signaux entrant
et sortant
• Sélectionnez ‘USB Audio CODEC’ comme
carte son de l’entrée et de la sortie des
paramètres de votre système audio
*Remarque* Désactivez toutes les fonctions
“Software Thru” qui peuvent être actives
pendant l’enregistrement.
(DE) Um mit dem Computer aufzunehmen,
gehen Sie wie folgt vor:
• Schließen Sie ein Mikrofon an den
MICIN-Eingang und/oder eine
Stereoquelle an die 2-TRACK-Eingänge
an. Schließen Sie Kopfhörer an die
PHONES-Buchse an
• Drücken Sie die LINE/USB FROM-Taste,
um USB PLAY zu wählen
• Drücken Sie die LINE/USB TO-Taste,
umPHONES zu wählen
• Lösen Sie die 2-TRACK TO-Taste
(MAINMIX)
• Schließen Sie den Mischer mit dem
mitgelief erten USB-Kabel an einen
freien USB-Port an. Der Computer
benötigt einige Sekunden, um Ihr Gerät
zu erkennen
• Wenn Sie einen Windows-Computer
benutzen, laden Sie in der Rubrik
“Support” von behringer.com den
BEHRINGER USB Audio Driver herunter,
um eine möglichst geringe Latenz
zu erzielen. Alternativ ist auch
der kostenlose ASIO4ALL-Treiber
verwendbar. Dadurch können Sie
Ihre Aufnahmen abhören, ohnedass
zwischen den eingehenden und
ausgehenden Signalen eine
wahrnehmbare Verzögerung entsteht
• Wählen Sie in den Audioeinstellungen
Ihres Systems die Option ‘USB Audio
CODEC’ als Soundkarte für den Eingang
und Ausgang
*Hinweis* Achten Sie darauf, dass während
der Aufnahme keine “Software Thru”-
Funktion aktiviert ist.
(PT) Siga esses passos para criar gravações
no seu computador:
• Conecte um microfone ao MIC IN
e/ou uma fonte estéreo às entradas
2-TRACK. Conecte os fones de ouvido ao
jackPHONES
• Pressione o botão LINE/USB FROM para
selecionar USB PLAY
• Pressione o botão LINE/USB TO para
selecionar PHONES
• Ajuste o botão 2-TRACK na posição
UP(MAIN MIX)
• Conecte o mixer a uma porta USB com
o cabo USB que vem incluído. Irá levar
alguns segundos para o computador
reconhecer o dispositivo
• Se estiver usando um computador
Windows, baixe o driver de áudio
BEHRINGER USB Audio Driver da seção
Support do site behringer.com para
conseguir baixa latência. O driver
gratuito ASIO4ALL pode ser usado
alternativamente. Isto lhe possibilitará
monitorar suas gravações sem ouvir o
atraso entre os sinais de entrada e saída
• Selecione o ‘USB Audio CODEC’ como
o cartão de som tanto para a Entrada
quanto para a Saída no seu sistema de
conguração de áudio
*Observação* Certique-se de que
nenhuma função “software thru”
estejaativada enquanto estiver gravando.
24 XENYX 302USB 25 Quick Start Guide