


11
MINICOM COM800
DEUTSCH
4. THE MINICOM IN PRACTICE
Typically, music production comprises three steps: the actual recording as well as the mix and
mastering processes. First of all, individual signals are recorded. In a computer-based production
environment this means that each instrument is recorded on a different track. When using software
sound generators, the individual signals are directly available from the computer. Mixing means that
the volume levels of the instruments are adjusted, effects are added were needed and the frequency
range of each instrument is optimized with equalizers. During the mastering process equalizers and
control amplifiers are used to give the mix the finishing touch, so as to achieve a homogeneous
sound and optimum loudness.
Compressors have become the standard tool for dynamics processing during all stages of a
production. Today, these popular control amplifiers are widely used for music production.
Traditionally, compressors are used to limit the dynamic range of a signal, i.e. to reduce the difference
between the highest and the lowest signal levels. This is useful, in particular, to control volume
fluctuations in instrument signals during the mixing process. In addition, compression can also be
used to enhance the sound of a production.
4.1 How to set levels correctly
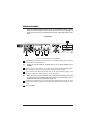
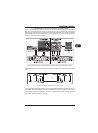
4.1.1 The I/O LEVEL switch
Before you can give your signals additional punch and power, please make sure to set the levels of
your MINICOM correctly. First of all, adjust the proper operating level using the I/O LEVEL switch
on the rear panel of the unit. -10 dBV are used in a consumer environment, +4 dBu in professional
recording studios. Many semi-professional audio cards and studio devices can be set accordingly
by means of a hardware/software switch. Mixing consoles usually work with the professional 4 dBu
level, while guitars, basses, keyboards and consumer equipment (CD/MD-DAT players/recorders)
use -10 dBV. If you are not sure which level to use, please consult the users manuals of your
devices or simply try which setting gives you a reasonable level on the IN/OUT LED display .
Always make sure that the INPUT LEVEL control is set to zero and the METER switch to
INPUT.
+ If you can select the operating level used by your studio equipment, please be sure
to have the same level used by all devices.
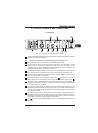
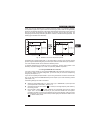
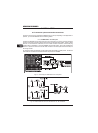
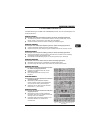
4.1.2 Signal adjustment
Wire the MINICOM as described in chapter 5.1, depending on the application. Now, apply the signal
to be compressed and use the METER switch to set the IN/OUT LED display to INPUT, so
that it shows the input level. Turn the INPUT LEVEL control , until the signal level displayed is
around the 0 dB marking between -6 dB and +6 dB and the CLIP LED does not light up.
Select the preset of your choice and activate the compressor in the signal path with the IN/OUT
button . The GAIN RED LEDs display the gain reduction produced by the compression
process. Check the output signal by setting the IN/OUT LED display to OUTPUT using the
METER switch , and raise the level until the signal is around the 0 dB marking between -6 dB
and +6 dB. Since the GAIN RED LEDs show the gain reduction achieved by compression, they
give you an indication of the level by which the signal can be raised with the OUTPUT LEVEL control
.
4. THE MINICOM IN PRACTICE