


ENGLISH
PRO MIXER DX2000USB User Manual
6
ENGLISH
PRO MIXER DX2000USB User Manual
7
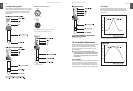
Equalizer3.3
The channel EQ section comprises three control knobs
and two switches. The EQ ON [ 16] switch activates the tone
controls which enable cut and boost of HIGH [ 6] , MID [7] and
LOW [ 8] frequencies respect ively (see below for specs.) EQ
can sweeten or effect a track, with the fading out and in of
frequency bands being very popular.
EQ Frequency Range Centre
High Shelving EQ 15 kHz +6/-18 dB OFF
Mid Peaking EQ 1.4 kHz +6/-25 dB OFF
Low Sheiving EQ 50Hz +6/-25 dB OFF
Tab. 3.2: Equalizer of the stereo channels
EQ is particularly useful if two or more music tracks ◊
are playing together, as frequencies often clash. Low
frequencies in particular can phase and cancel, causing
uneven bottom-end response. The trick is to cut the
bass from all but one track playing. You can roll o the
bass by turning LOW fully counterclockwise.
Output3.4
Channel level is controlled by a precision stereo 100-mm
fader [ 14] .
The faders used are high-quality true-log faders. ◊
These give ultra-smooth operation even at low levels,
on a par with those used in the most expensive
studio consoles.
Press the CROSSFADER switch [ 17] to send the channel signal
to either of the two stereo submixes, which we call X and Y.
The ASSIGN button [ 18] selects between these two submixes,
and a pair of LEDs [ 19] clearly show you which of X or Y is
currently selected per channel. The X and Y mixes are then
routed to opposite ends of the main crossfader [ 33] .
You can immediately tell if any channel is switched ◊
on (CROSSFADER switch depressed) by looking at the
master ASSIGN X and ASSIGN Y [ 36] indicators situated
under the crossfader.
Talk Over4.
Let’s say you are talking over a music intro. You would almost
certainly want to attenuate the music while you speak.
The DX2000USB talk over system does this for you—
automatically. Depressing the TALK OVER button [ 11] on a
mic channel engages the talk over system. You can leave this
button down all the time—it will not affect the music unless
you speak into the mic, provided you set the system up
correctly. How do you do this?
If you look to the left of the main bargraph meters you will
see three rotary controls and two LEDs. These are the master
talk over adjustments you will want to make. Once you have
set them up for your system you will probably not have to
alter them unless something else is changed.
SENSITIVITY [ 23] sets the speech level threshold at which
attenuation (also called gain reduction) kicks in once talk
over is activated by a mic channel signal.
TIME [ 24] controls the rate at which music volume recovers
after a mic channel signal has activated the automatic music
level reduction process.
DAMPING [ 25] allows you to adjust the depth of music
attenuation triggered by the mic channel signal.
To set up these controls properly, first turn DAMPING full on
(MAX). Set up the gain on your mic channel using PFL. Now
adjust SENSITIVITY until the music is always attenuated by
a voice signal. (Attenuation is at MAX to enable you to hear
this adjustment as clearly as possible.)
Take care to ensure that SENSITIVITY is not set too ◊
high, otherwise spill from loudspeakers into the mic
could trigger the talk over system, and the music
volume will just keep going up and down! (You have
set up an intermittent negative feedback loop.)
Once SENSITIVITY has been set so that talk over is only being
activated by speech, it’s time to fine-tune the system with
the other two controls again, according to taste. Twin LEDs
let you know how your talk over system is behaving. When
DAMP [ 27] is lit, your music is being automatically attenuated.
ON [ 26] lets you know that one or both mic channels have
talk over engaged.
If two mics are being used, set SENSITIVITY with both ◊
mic channels switched on.
Talk over could just as easily be used for MC-ing. It ◊
might not however be appropriate for rapping, which
takes place alongside rather than over the music,
unless the damping eect is set to be quite subtle.
Master Audio Outputs5.
Crossfader5.1
The heart of your music mix is the horizontally-mounted
infinium optical crossfader [ 33] , which controls the blend of
the X and Y mixing channels. When set fully to the left, only X
is heard in the mix, and vice versa. We know how much you
rely on this, and for that reason we have not only ensured
that it is incredibly durable and smooth-acting. We also allow
you to tailor its response to your “feel” by means of a simple
adjustment (see chapter 11 “CROSSFADER ADJUSTMENT”).
The crossfader is most often used to fade one track into
another during a DJ mix.
If you are bringing in an intro over an outro, there ◊
will be a time when you want to hear both tracks
at full volume. Simply pause your crossfader in the
middle position until you are ready to fade out the
outgoing track.
The crossfader is actually a sophisticated VCA ◊
controller. Its ultra-high quality design means that you
can expect nearly endless operations without failure.
And even if the fader does get something nasty poured
over it by mistake (please don’t do this!) the quality of
your music should be unaected. This is because no
audio signal actually passes through your crossfader,
unlike on many other DJ mixers.
You can immediately tell if any channel is switched ◊
on (CROSSFADER switch depressed) by looking at the
master ASSIGN X and ASSIGN Y indicators [ 36] situated
under the crossfader.
Transforming with punch and cut5.2
Transforming is a DJ term used to describe the chopping
up of sound to create dramatic effects. Traditionally this is
done by rapidly moving a crossfader to give a stuttering or
“gated” effect, either between two music sources, or one
source and silence. Another DJ trick is to use the channel
faders or channel on buttons to chop one music track over
another. These methods are still valid, but if you are looking
for instantaneous transforming action, check out our
ergonomic alternative—a pair of big assignable PUNCH/CUT
buttons. We are sure you will grow to love their speed and
ease of operation.
Punch and cut are two transform modes selectable by
the TRANSFORM MODE button [ 48] . A pair of LEDs [ 49] lets
you know whether PUNCH or CUT is active. The X and Y
PUNCH/CUT buttons [ 34] and [ 35] are ergonomically situated
by the crossfader with which they are designed to work.
CUT mode enables the big buttons to be used as mutes for
interesting gating effects, temporarily silencing the X or Y
output. In PUNCH mode the X button [ 34] introduces the X
signal to the mix, while the Y button [ 35] brings in the Y signal.
This means you can add in bits and beats from X on top of Y
and vice versa, opening up your scope for creative mixing.
This is the rst time we have come across any really ◊
BIG buttons on the DX2000USB. At this point it’s
worth pointing out that all the smaller switches on
your DX2000USB are latching. This means they stay
down until you hit them again. Big buttons are all
non-latching, or momentary in operation. This means
that they are only active when your nger (or other
appendage) is actually holding them down, like the
keys on a MIDI keyboard. These are ideal for executing
transformations, as you will very quickly nd as you
get into using your DX2000USB.
Try running a rhythm track through X (crossfader fully ◊
to the left). Now use the Y button in PUNCH transform
mode to manually chop in a sustained signal like
orchestral music, ambient sounds, noise, whatever.
As well as using the X - Y crossfader to select / fade ◊
between X and Y you can also use it to blend X and
Y together, by simply leaving it somewhere in the
middle. Now you can use the big buttons in CUT mode
to chop between X and Y for more creative music
gating eects.
You can send more than one channel to either X, Y or ◊
both. In practice you will usually only send one at a
time, but if you are layering tracks you might want to
send more. Also you can crossfader between channels
assigned to the same side of the crossfader using the
100 mm channel faders.
Main/tape outputs5.3
Level to the main outputs (Max. output +28 dBu balanced,
+22 dBu unbalanced) is ultimately governed by a pair of
precision 60 mm main faders [ 30] . This level is continuously
monitored by the pair of highly accurate tri-colored
bargraph meters [ 38] sited immediately above the output
faders. The main outputs constitute a blend of X and Y, as
well as channels not assigned to the crossfader, and the
two mic channels, all covered previously in the manual, plus
the stereo effects return. The main output also feeds the
RECORD OUT jacks on the back of the console.
The LINE OUT jacks on the top of the console are taken ◊
directly from the output of the crossfader. This mix
does not include the mic channels 1 and 2.
Never connect to both sets of LINE IN/OUT jacks ◊
(see chapter 10 “CONNECTIONS”).
Main boost and main dim5.4
MAIN BOOST [ 28] and MAIN DIM [ 29] are big non-latching
buttons acting on the main outputs, temporarily boosting
(by +4 dB) and cutting (by -20 dB) volume.
MAIN DIM could be used for audience sing-along ◊
bits. Or you could use MAIN BOOST to emphasize the
beats etc.
MAIN BOOST should not be applied for more than ◊
just spot eects, as you will probably stress the sound
system, or simply cause the limiters to come in harder.
Zone5.5
The ZONE stereo output [ 69] is a second main mix output
with its own totally independent ZONE LEVEL control [ 41] .
This can be used for feeding the mix into a separate sound
system such as DJ foldback, or another room or area in a
dance club.
Effect return5.6
A line-level stereo effect RETURN [54] (Max. gain 30 dB)
feeds directly into the mix, level being adjusted by the
FX RETURN knob [ 42] . This input is designed to accept the
output from a mono or stereo effects unit (see chapter 10
“CONNECTIONS”). It could also be used to return another
stereo music source such as DAT or mini disc if five stereo
channels are not enough for your music needs.
USB connection5.7
The DX2000USB has built-in USB connectivity, allowing
stereo signals to be sent to and from the mixer and a
computer. The audio sent from the mixer to a computer is
identical to the RECORD OUT signal. Audio being sent from
a computer to the DX2000USB can be selected with the
Channel 3 INPUT button.