


ENGLISH
PRO MIXER DX2000USB User Manual
8
ENGLISH
PRO MIXER DX2000USB User Manual
9
Connect a USB type B plug into the USB jack on the mixer,
and the other end into a free USB port on your computer.
There are no required drivers, but we recommend that PC
users install the included ASIO driver. The driver can also be
downloaded from behringer.com.
Headphones, Monitors & P6. FL
Monitoring6.1
A separate stereo MONITOR output [ 68] is provided. Level
is controlled by a single 60 mm MONITOR stereo fader [ 32] .
The monitor signal is taken directly from the main mix.
Engaging PFL anywhere on the board changes the monitor
source to PFL.
Main fader adjustments will ◊ not aect the level of
the monitor output—unlike on standard recording
consoles where monitor follo ws the main faders.
PFL in the studio6.1.1
In a studio setup, the monitor output is normally sent to
an amplifier driving a pair of speakers facing the operator.
(The main output might feed a tape recorder (recording
studio) or transmission line (broadcast studio)). In the studio
environment, PFL (Pre-Fader-Listen) is the preferred way
to set up an individual channel. Depressing a channel’s
PFL button cancels the mix from the monitor output and
replaces it with that channel’s signal. Now the DJ or engineer
can hear in isolation what’s going on in one (or more)
channel(s), via headphones or the monitor speakers. During
PFL, channel level is sent to the PFL meter to enable accurate
gain setting.
PFL in the club6.1.2
In a club, the main output would normally drive the house
PA, while the monitor output could offer foldback into the DJ
area, usually via a separate amp and speaker(s). In the club
environment, things get messy. You can’t hear any sound
in isolation, either on a foldback system or headphones,
because both are to some extent drowned out by the main
PA system. You should, however, be able to hear the PFL
signal loud enough to detect the beat, cue starts etc. What
you can’t do is to judge by ear exactly what level the next
track will come in at. For that you must use your eyes and the
highly-accurate bargraph meters.
PFL is in stereo: if you PFL a stereo channel you will ◊
hear it in stereo even though there is only one PFL
bargraph meter. If a mono channel is PFL-ed, you will
hear it according to the position of the channel PAN.
This is a professional feature and called “Solo-In-Place”
in big recording consoles.
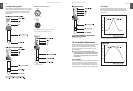
Headphones—read carefully—this 6.2
is tricky!
The PHONES section lies to the far right hand side of the
DX2000USB, below the headphones stereo jack socket [ 43] .
PHONES LEVEL [ 45] controls headphones level. Right, that’s
the easy bit explained. Now pay attention.
OPTION 1:
The PHONES output can have as its source either PFL or Main
mix selected by the MAIN/PFL switch [ 44] . When this switch
is down, headphones follow the same logic as monitor, i.e.
main mix unless any channel has PFL engaged. When it is
up, headphones audition PFL only, i.e. if no channel’s PFL is
engaged, the heaphones will fall silent. (NOTE: SPLIT switch
is UP here)
OPTION 2:
Depressing the SPLIT switch [ 47] disables the PFL/MAIN
switch, activating instead the BALANCE control [ 46] . The
headphones mix is now in mono instead of stereo as
previously, and BALANCE controls the blend of the PFL and
MAIN mix signals. This gives you the interesting possibility
of hearing both the outgoing (MAIN) and incoming
(PFL) tracks simultaneously through a single output, via
your headphones. The same signal can be heard at the
monitor output so long as the PHONES TO MONITOR
button [ 31] , sited above the MONITOR fader, is depressed.
(PHONES TO MONITOR forces the monitor output to follow
the headphones.)
Permanent PFL—using PFL as a 6.3
listening subgroup
We have seen that with both the PHONES TO MONITOR
and PFL/MAIN switches depressed, your monitor output is
always looking at PFL, not switching automatically between
PFL and the main mix. Now you can actually use the stereo
PFL bus as a subgroup with its own stereo output (the
MONITOR output).
Another way to keep the monitors xed on PFL is ◊
to make sure a PFL button is always left engaged
somewhere on the desk. You could simply leave a PFL
button depressed on an unused, unassigned channel.
If your channel fader is always brought up to +6 dB
(i.e. full-on as per usual with you DJ types) then comparing
PFL values will give a true indication of relative mix volume
between tracks. Now all you have to do in order to achieve
a totally professional-sounding volume-consistent mix is to
adjust each successively incoming track’s gain until the PFL
meter is hitting 0 dB (or whatever level you think you can get
away with) before you bring it in with the crossfader. It’s that
simple. Try it ...
Sub Bass7.
The sub bass output [ 63] on the back panel comes with two
rotary controls, one for output LEVEL [ 62] (max. +22 dBu)
and another for adjusting the crossover frequency of the
low pass filter, CROSSOVER FREQUENCY. [ 61] (low pass filter
variable from 30 Hz to 200 Hz). This can be used to drive
a very low frequency sound system in a studio or club to
provide added bottom end.
Sub bass units are often useful in small studios where ◊
there is no room for large extended-range monitors in
front of the mixer.
Controlling External Devices8.
Desk lamp8.1
A connector [ 37] for an optional standard 12 V working light is
offered, immediately above the bargraph meters. You should
only use 5 Watt lights.
Remote control of audio devices8.2
We have not yet mentioned the big non-latching TRACK
START buttons [ 20] immediately below the faders on
channels 3 to 7. These have nothing to do with the audio
side of your desk. They are REMOTE CONTROL buttons for
interfacing with certain audio sources such as CD players,
CART machines etc. which have remote jacks built into them.
Please refer to the manufacturer’s specifications to see if your
equipment conforms to this protocol. If it does, connection
to the DX2000USB is by simple jack leads [ 55] on the rear
panel. Please ensure that your equipment’s remote control
output does not exceed 30 V DC/50 mA (This is unlikely!).
The advantages of REMOTE CONTROL are purely
ergonomic—you don’t have to stretch over the desk to bring
in an audio file, jingle or music CD in on cue. For clarity of
function it is best to associate each REMOTE button on the
DX2000USB with the device supplying audio to the stereo
channel immediately above it. Otherwise things could get
very confusing! Please refer to the specifications of the
equipment you want to connect.
Sound-to-light8.3
A mono audio output [ 60] is provided for connection to
lighting controllers with a sound-to-light facility. Connection
is via a standard ¼" jack on the back panel. Sensitivity is
conveniently adjustable from the DX2000USB by the LIGHT
LEVEL knob [ 40] to the left of the bargraph meters. Too high,
and the lights will stay on, too low and they won’t flash at all.
Adjust LIGHT LEVEL until lights flash in time with the music.
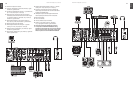
Connections9.
PRO MIXER DX2000USB connections9.1
Follow us on a walk along the rear panel of your PRO MIXER,
starting left:
Channel inserts. For inserting into the channel signal, [50]
pre-EQ and pre-fader. Unbalanced, send and return on a
single ¼" jack socket, wired tip = send (out), ring = return
(in) and sleeve = ground/screen.
Line input. Balanced ¼" jack socket, wired tip = hot (+ve), [51]
ring = cold (-ve) and sleeve = ground/screen.
Mic input. Balanced XLR, wired pin 1 = ground/screen, [52]
2 = hot (+ve) and 3 = cold (-ve).
(Aux) Send. Unbalanced ¼" jack socket, wired tip = signal [53]
and sleeve = ground/screen.
(Aux) Return. Unbalanced ¼" jack sockets, wired tip = [54]
signal and sleeve = ground/screen.
Remote control. ¼" jack socket.[55]
Line Input (Input 7). Unbalanced ¼" jack sockets, wired [56]
tip = signal and sleeve = ground/screen.
CD inputs. RCA sockets.[57]
CD inputs. RCA sockets.[58]