


ENGLISH
PRO MIXER DX2000USB User Manual
12
ENGLISH
PRO MIXER DX2000USB User Manual
13
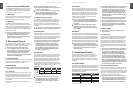
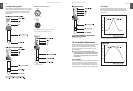
Plug soldering guide9.2
You will need a lot of cables for different purposes—see the
following figures to make sure you have got the right ones.
Use custom-made RCA cables for all connections which
use RCA sockets (centre post = signal (+ve) and sleeve =
ground/screen).
Balanced use with XLR connectors
input
output
1 = Ground / Shield
2 = hot (+ve)
3 = cold (-ve)
For unbalanced use pin 1 and pin 3 have to be bridged
Fig. 10.1: Un-/balanced jack plugs and balanced XLR connectors
Fig. 10.2: Headphones connector
Fig. 10.3: Insert send/return plug
Crossfader Adjustment10.
On the main motherboard you can find two potentiometers,
which you can adjust with a little screwdriver. These
potentiometers are identified as OVERLAP and SLOPE.
You can unscrew the bottom of your mixer to reach the
main motherboard.
Please be aware that the BEHRINGER warranty ◊
becomes discretionary when you start disassembling
your DX2000USB! Don’t even think of it, if you make
much of your warranty privileges. Sorry, but we have
to mention this.
Overlap10.1
With the OVERLAP potentiometer (VR43) you can adjust the
increase or decrease in dB, which is conducted when the
crossfader is located in the middle position. Ex works this
value is adjusted at -3 dB and should not be modified. This
guarantees a constant volume across the entire fader path.
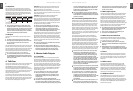
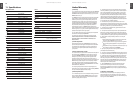
Slope10.2
With the SLOPE potentiometer (VR44) you can adjust the
fade over process of the both channels. Dependent on the
setting of the SLOPE potentiometer there are the following
volume curves:
Fig. 11.1: Volume curve I (SLOPE potentiometer completely left)
Fig. 11.2: Volume curve II (SLOPE potentiometer completely right)