


6 FEEDBACK DESTROYER PRO FBQ2496 User Manual
3. Control Elements
and Connections
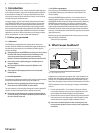
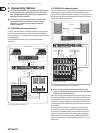
3.1 The front
(1) (4)(2) (5)(3)
(6) (7)
Fig. 3.1: Control elements on FBQ2496’s left side
(1) LEVEL METER
The LEVEL METER lets you monitor the input level. Eight LEDs are available
per channel. If the Clip LED lights up, digital distortion may occur on
FBQ2496’s input. In this case, reduce the input level.
(2) LEARN button
A quick tap on the LEARN button (LED lights up) gets you into the LEARN
mode. The FBQ2496 will immediately start looking for critical frequencies
and will deploy as many Single-Shot lters as necessary (of course, musicor
noise has to be present in the room for this to work). Besides, using the
wheel (17), you can manually determine the number of Single-Shot lters
(max. 20 per channel). See ch.4.1.
If you keep the LEARN button pressed for longer than one second
(LEDblinks), the FBQ2496 generates progressively louder impulses to
generate feedback. The feedback thus created enters the FBQ2496 at its
input, whereit is recognized and suppressed. This mode is called AUTOLEARN
(ch.4.1).
(3) PANIC
If unexpected feedback starts occurring during a performance, pressing the
PANIC button can help. As long as the button is kept pressed (for a maximum
of 1 second), your FBQ2496 rapidly searches for feedback frequencies and
suppresses them.
(4) SPEECH
Pressing the SPEECH button increases the sensitivity of feedback
suppression; the FBQ2496 recognizes critical frequencies sooner and deploys
a lter that cuts in appropriately.
Unlike with feedback caused by a distorting guitar, human speech
seldom produces signals that can mistakenly be identied as feedback.
Therefore,this mode is ideal for situations in which only speech is being
transmitted. Therefore, your P.A. system will be substantially louder.
(5) FREEZE
Once a particularly good FBQ2496 setting is achieved, you can keep this
setting by pressing the FREEZE button. All Single-Shot and automatic lters
are kept at their settings until you press FREEZE again.
(6) FILTER LIFT
The so-called “Filter Lifting Time” informs you about how long an adjusted
automatic lter can remain inactive before its values are reset again. You can
set this time by rst briey pressing the FILTER LIFT button and then turning
the wheel. The following time lengths are available: 0 min, 1 min, 5 min,
10 min, 30 min, 60min.
(7) RESET
If you briey press the RESET button, all automatically set lters are erased.
If you keep the RESET button pressed longer, Single-Shot lters are erased
aswell.
In PEQ mode, briey pressing the RESET button erases the selected lter.
Keeping the RESET button pressed longer erases all the parametric lters all
at once.
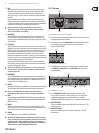
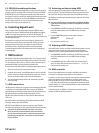
(8) (9)
Fig. 3.2: Status display and the LED display on the FBQ2496
(8) STATUS DISPLAY
The FBQ2496 features a total of 40 lters, i.e. 20 lters per channel.
Theycan be monitored and controlled on the Status Display. A constantly lit
LEDsignalizes:
• A lter was deployed: It already suppresses an instance of feedback. or:
• A lter is in the Parametric EQ mode (PEQ), whereby gain has to be set
to a value either higher or lower than 0 dB. A LED that only periodically
blinks signalizes the selected lter in the PEQ mode.
(9) LED Display
The three-digit numeric display indicates the absolute value of the
parameter you are modifying. How individual parameter are adjusted is
explained in ch. 4.
• Hz or kHz is lit when you change the mid frequency of a lter.
• The min display is lit when you are adjusting the lter lift time.
• The 1/60 LED is lit when you select a lter value smaller than 0.1. In this
case, you can select the following values: 1/60, 2/60, 3/60, 4/60 and
5/60 (6/60 = 0.1).
• The dB LED is lit when you adjust a lter gain value.
• The MIDI display briey lights up as soon as the FBQ2496 receives
MIDIdata.
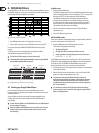
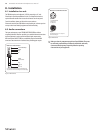
(12)(10) (13)(11)
(16) (17) (18)(14) (15)
Fig. 3.3: Control elements on FBQ2496’s right
(10) GAIN
In the PEQ mode, the GAIN button lets you adjust lter gain in dB
(from+15 dB to -15dB in 0.5-dB increments, and from -16 dB to -36 dB in
1-dB increments). The dB value set using the wheel is shown in the display.