EURODESK SX4882
8-track MIDI suite/dance production studio18
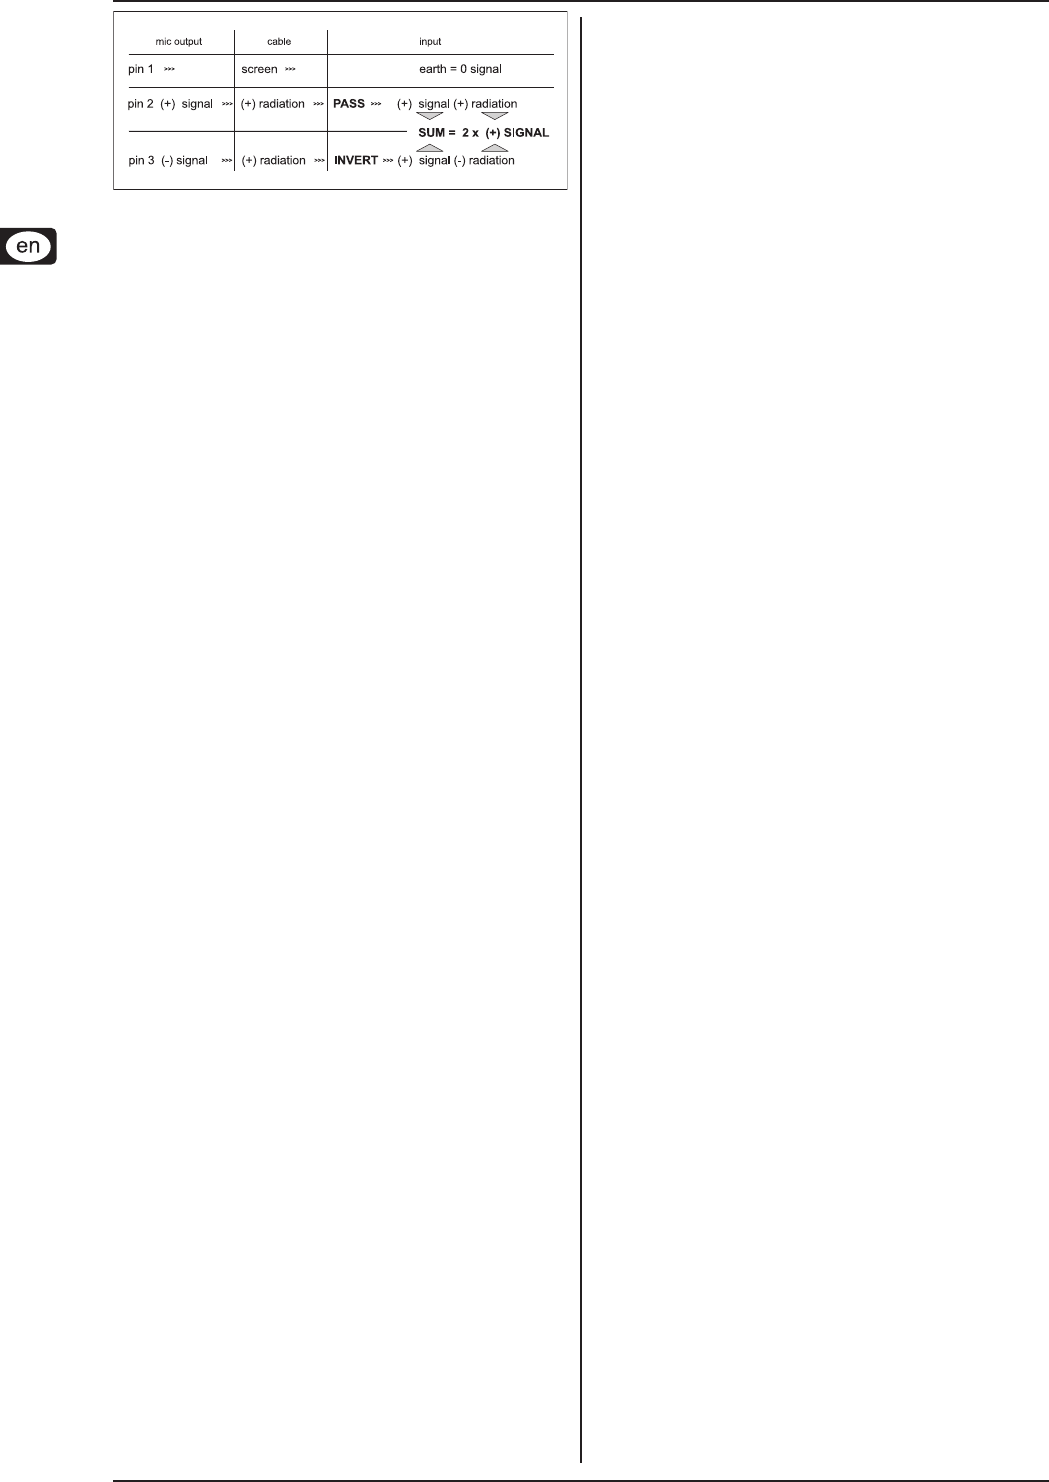
A balanced microphone lineFig. 12.1:
Start-up13.
A-channel setting up procedure13.1
Selecting inputs13.1.1
= MICROPHONE: MIC/LINE switch (S1) UP, PAD switch (S1a)
UP, FLIP switch (S3) UP
= LINE: MIC/LINE switch DOWN, FLIP switch UP
= TAPE: FLIP switch DOWN
Initializing channel for gain-setting13.1.2
Set GAIN (P2) and all aux sends (P12,13,14 and 15) to OFF 1)
(fully counterclockwise).
EQ switch (S10) UP (off).2)
LOW CUT switch (S11) ON for microphones, OFF for signals 3)
with desired low frequency content.
CHANNEL MODE set to PFL (S95 UP).4)
Channel PFL/SOLO (S26) switch UP (L26 off).5)
Check that main PFL/SOLO LED (L95) is not lit.6)
Channel PFL/SOLO switch (S26) DOWN (L26 and L95 7)
should light).
Auditioning a signal13.1.3
Make a typical noise, or roll the tape. The -20 dB light should 1)
icker, showing that a signal is present. There should also be
some activity at the MAIN MIX bargraph meters, indicating
the SOLOed level.
For LINE INPUTS: Adjust GAIN control (P2) until transient 2)
peaks are regularly hitting 0 dB.
For MIC INPUTS: If your meters are reading 0 dB although 3)
the GAIN control is completely turned counterclockwise, push
the PAD switch (S1a) to lower the input signal by 20 dB before
you continue the gain adjustment.
TAPE inputs do not pass through the GAIN pot (P2). This is 4)
why it is important to match the operating level of the desk
(-10 dBV or +4 dBu) to that of your machine. If the signal is
low (due to incorrect operating level setting or too low a level
having been recorded to tape), try the -10 dBV setting. If too
high, try +4 dBu. If neither gives a good level, try patching
the tape track output into a line input and repeat steps 13.1.1
and 13.1.2.
lf EQ is used, repeat steps 13.1.1 & 13.1.2.5)
If an insert is used to patch in a compressor, gate, EQ, etc., use 6)
any outboard processor’s BYPASS or EFFECT OFF switch to
A/B monitor the effect. Adjust the processor’s output level so
that effected and bypassed signals are level matched.
Channel PFL/SOLO switch (S26) UP. Move onto next 7)
channel.
Desk/tape setting up procedures13.2
Desk normalization13.2.1
All board settings should be set to the normal default condition
before or after every session. Usually faders are set to zero (minus
innity), EQs set at and switched out, trimpots and channel aux
sends turned fully anticlockwise etc. The natural initial setting
for some pots, e.g. master aux sends, is unity gain. However,
some settings, such as selecting PRE or POST for channel aux
sends and whether TAPE or MIC/LINE is ipped onto B-channel
etc. will depend on the operating environment, whether in a MIDI
or A/V suite, 24-track studio or live venue, or even just on the
engineer’s preferred way of working. Ultimately, the object of the
excercise is:
Multitrack initialization13.2.2
Set up the multitrack so that any track in “record ready” condition
has its input monitored when the tape is stationary. Place all tracks
to be recorded into “record ready” status (once a recording has
been made, these tracks should automatically switch to tape play-
back). Check that the input levels to each TRACK are optimized
before recording commences.
Recording levels13.2.3
When recording to digital, it’s a good idea to keep the recorder’s
PEAK READING meters below 0 dB. Engage “peak hold” on your
recorder if you want to conrm that you haven’t inadvertently
overstepped the mark during a take or mix. Most digital recorders
(though not SAMPLERS) read 0 dB with some headroom left. This
is because, unlike with analog, the onset of digital distortion is as
sudden as it is horrible, and the manufacturers of digital recorders
don’t want you to hear this! If you really want to take your recording
level to the limit (and fully exploit digital’s 96 dB dynamic range),
you’ll have some calibrating to do. You could run a tone at 0 dB from
the mixer, and use that as your DAT or digital multitrack recorder
reference. But your DAT or digital multitrack recorder may still be
10 to 20 dB off its headroom limit. Probably a better way to work
out just how hard you can drive your recorder is to incrementally
increase the record level until it well distorts, subtract, say 6 dB,
and never ever exceed that level.
When recording to analog, the tape machine’s VU meters should
show around +3 dB on BASS, but only around −10 dB for HI HAT.
Although analog distortion is more like compression at modest
overload levels (often desirable on bottom end), higher frequencies
cause saturation even at modest levels (an unpleasant “crunchi-
ness”). Also, VU meters tend to progressively under-read above
1 kHz, due to their sluggish response time.
Auditioning a mix13.2.4
In order to be heard other than when PFL/SOLO-ed, channels
must be routed to the main mix bus. This can be either from the
channel routing matrix directly, via one of the subgroups, or from
the MIX-B bus (S48 DOWN).
Channels going to tape are usually monitored via the tape return
channel, whether A or B. In this case the main mix button of the
channel going to tape should be UP, while that coming back
should be DOWN (if on an A-channel). Tape tracks returning on
B-channels will always be heard so long as the MIX-B/MAIN MIX
switch (S48) is depressed.
Some to-tape channels will have no routing other than a direct out
patch into the recorder, others may be routed through subgroups.
When a subgroup is sending to tape, the subgroup L/R assignment
buttons (S37, 38) should be UP. I.e. that subgroup should not feed
into the main mix bus directly.
8-track MIDI suite/dance 14.
production studio
8-track MIDI studio with sampler, 8-track recording system, one
vocal microphone and an array of synthesizers and FX. MIDI
sequencer driven. A typical dance production suite.


