


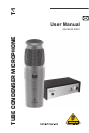

TUBE CONDENSER MICROPHONE T‑1
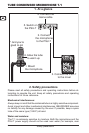
Set-up
4
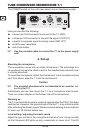
The POWER switch on the unit's rear panel turns on the power supply.
Here you also nd the following:
a seven-pin XLR connector to connect to the T-1 ( = MIC),
a three-pin XLR connector to transmit the signal ( = OUTPUT),
a switch to suppress signal humming noise ( = GND LIFT),
an = IEC power receptacle
and a fuse holder. =
Use the provided cable to connect the T-1 to the power supply +
unit!
Set-up4.
Mounting the microphone
The microphone comes with an elastic shockmount. The advantage to a
conventional microphone stand mount is that mechanically induced noise
is virtually absorbed.
To mount the microphone, attach the shockmount to the microphone stand
and, from above, slide the T-1 into the shockmount.
Caution
The provided shockmount is not intended to be used for + sus-
pending the T-1!
Alternatively, you can also mount the T-1 on a microphone stand mount.
There is a screw adapter on the bottom side of the microphone.
Warming up
The T-1 can basically be used a couple of seconds after the PSU-T has been
switched on. However, the typical sound of the the T-1 only unfolds a while
after activating the power supply. We recommend allowing the microphone
to “warm up” 30 minutes before use.
Level setting / adjusting the basic sound
Adjust the gain control in the microphone channel of your mixing console
so that the peak LED lights up only occasionally or never at all. The EQ