


-14-
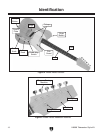
H8068 Telecaster
®
Style Kit
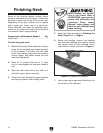
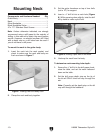
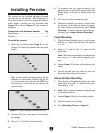
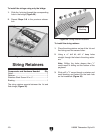
Figure 16. Flush mounted ferrules.
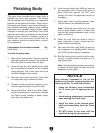
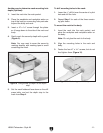
Figure 17. Above surface mounted ferrules.
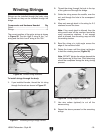
Installing Ferrules
The strings can be installed optionally through
the body using the ferrules. One advantage of
using the ferrules is that the strings will sustain
notes longer. Ferrules can be mounted flush
(Figure 16) or above (Figure 17) the surface of
the guitar.
Components and Hardware Needed: Qty
Guitar Body .......................................................
1
Ferrules ............................................................. 6
To install the ferrules:
1. Mark the six string holes (Page 6) on the
bridge. (The holes are parallel with the guitar
body.)
4. To minimize tear out, tape the back of the
guitar where the pilot bit will emerge from the
ferrule holes, and place a board under the
guitar.
5. Drill the pilot holes through the body.
6. Determine whether you want to flush mount
the ferrules or let them sit above the body.
For flush mounting instructions, go to
Flush
Mounting. To mount ferrules above the gui-
tar body, go to
Above Surface Mounting.
Flush Mounting
1. Place the body topside down on a drill press
and drill
15
⁄32" down into the pilot hole using a
a
1
⁄4" bit.
2. Using a
5
⁄16" drill bit, drill
1
⁄16" deep into the
pilot holes.
Note: We recommend setting the depth stop
and using a
5
/16" end mill for greater preci-
sion.
3. Repeat Steps 1-2 for each of the other ferrule
holes.
4. Set the ferrules into the holes so they are
flush with the surface of the guitar.
Above Surface Mounting
1. Place the top of the guitar face down on a drill
press table, then drill
13
⁄32" down into the pilot
hole using a
1
⁄4" bit.
2. Note: We recommend setting the depth stop
for greater precision
.
3. Repeat Steps 1-2 for the five other ferrules.
4. Set the ferrules into the holes.
5. Go to Mounting Tuners on Page 15.
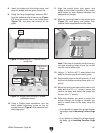
Tip: You can mark the holes using a drill bit
mounted in a drill press. Position the drill bit
in a ferrule hole and, with the drill
OFF, turn
the chuck by hand until the bit breaks the
wood surface.
2. Remove the neck, pick guard, control plate
and bridge.
3. Secure a
7
⁄64" drill bit in the drill press.