


-18-
H8068 Telecaster
®
Style Kit
Installing Nut
Components and Hardware Needed: Qty
Guitar Body .......................................................
1
Nut ................................................................... 4
Neck .................................................................. 1
Black Neckplate Setter ......................................
1
Silver Neckplate ................................................
1
Stainless Steel Screws #7 x 1
3
⁄8" ...................... 4
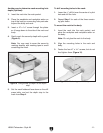
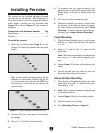
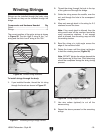
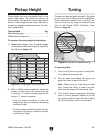
To install the nut:
1. Install the neck onto the body.
2. Use a chisel or razor blade to scrape any fin-
ish out of the nut slot. DO NOT remove any
wood from the nut slot.
3. Sand one side of the nut on a piece of sand-
paper by hand until it fits snugly into the nut
slot as shown in
Figure 25. Make sure the
large slots on the nut face the top of the neck
and the small slots face the bottom of the
neck.
Figure 25. Nut installed.
4. Remove the nut, spread a thin layer of glue
in the nut slot, and center the nut in the nut
slot.
5. Install the strings, as described on Page 19
,
to hold the nut in place until the glue dries.
6. Wipe away the excess glue before it sets up,
then allow the glue to dry for 24 hours.
Nut
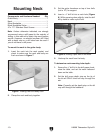
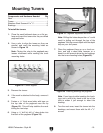
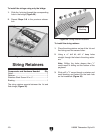
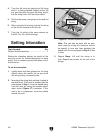
Strap Buttons
The strap buttons are positioned on the guitar as
shown in
Figure 24.
Components and Hardware Needed Qty
Guitar ................................................................. 1
Stainless Steel S
crews #4 x
15
/16" ..................... 2
Strap Buttons .....................................................
2
To attach the strap buttons to the guitar:
1. Using a
1
/16" drill bit, drill
3
/4" deep holes at the
end of the guitar—on the center line
— and
on the bass horn (
Figure 24).
2. Secure each of the strap buttons to the guitar
body with a #4 screw
.
Figure 24. Strap buttons.
Strap
Buttons
Bass
Horn