


9
ENGLISH
TYPE: This knob lets you dial in an effect (a chorus, a flanger and
so forth). It actually serves two purposes:
W
Turn the knob to select from among the different modulation,
delay and reverb effects depending on which effect block is
currently active (to find out which effects you have available,
check out the following example table and the tables in the
appendix under 11.1).
Note: The TYPE knob will only respond when an effect block has
been activated. For more on this, see MOD FX, DELAY, REVERB
above.
r
Tap it to select the PRE signal routing option, which is akin to
plugging a stomp box into the front panel
input. The display indicates that this option has
been selected when the bar located below
DELAY, MOD FX or REVERB lights up. Tap it
again to switch the effect to POST, in other
words, in front of the power amp and therefore generally in
stereo. The bar will disappear from the display. The two options
yield very different sonic results. A pre effect runs through all amp
sectors while a post effect is inserted very near the end of the
signal chain. Here too you should experiment to find out which
signal routing configuration works best for which situation.
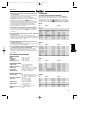
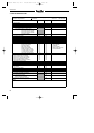
Example table featuring modulation effects.
TYPE PARA 1 PARA 2
Chorus Mono Rate 0.1 - 10.0 Depth 0 - 100
Chorus Stereo Rate 0.1 - 10.0 Depth 0 - 100
Flanger 1 Mono Rate 0.1 - 10.0 Intensity 0 - 100
Flanger 1 Stereo Rate 0.1 - 10.0 Intensity 0 - 100
Flanger 2 Mono Rate 0.0 - 10.0 Intensity 0 - 100
Flanger 2 Stereo Rate 0.0 - 10.0 Intensity 0 - 100
Phaser Rate 0.1 - 10.0 Colour 0 - 100
Phaser XL Rate 0.1 - 10.0 Colour 0 - 100
Tremolo Rate 0.5 - 10.0 Shape 0 - 100
PARA 1 and PARA 2: These also serve two purposes
W
Turn the knob to edit the parameters of the selected effect.
To learn more about editing an effect, see the table above and
the tables in the appendix depicted under 11.1.
r
Tap it to load the current value of the parameter into the
display without changing it.
s
PARA 2 also serves another purpose: A standard sustain pedal
for switching presets may be connected to the zenTera (see
also Rear Panel Connections, FOOTSWITCH). To be able to
switch back and forth between two presets, you must first
mark one of the presets. To do this, simply double click
s
PARA 2. To learn more about this, read section 6.5,
FOOTSWITCH.
MASTER
W
: It controls the level of the power amp.
This knob is global, meaning that it affects all presets.
Its setting cannot be stored.
TUNER: It performs three functions:
r
Tap it to activate the built-in tuning device. You'll find a
detailed description of this function under 6.3, TUNER.
t
Press and hold it to access the system menu (see 7.0).
r
You can tap TUNER once or twice (depending on the
currently active mode) to exit all functions and menus and
return to standard display mode.
STORE: It saves preset settings (see 6.4, STORE).
TAP: This button lets you manually sync the delay effect up to the
tempo of a song. Simply
r
tap in the desired speed. The
zenTera
®
gauges the time between taps and synchronizes the
delay accordingly. TAP will of course only work when a delay
effect is active. (To learn how to activate it, see MOD FX, DELAY,
REVERB above.)
Beyond that, the TAP function lets you record short guitar patterns
(e.g. rhythmic sequences) that the zenTera
®
will play back in
repetitive loops, which you can then solo over or use to create
interlocking grooves. You'll out more about this sampling option
under 6.6, TAP.
ZENTERA - MANUAL
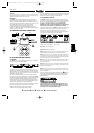
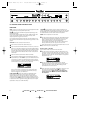
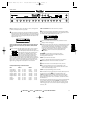
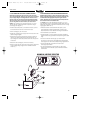
GAIN AMP TYPE BASS MID TREBLE PRESENCE PRESET DELAYMOD FX REVERB TYPE PARA 1 PARA 2
TUNER STORE
INPUT POWERVOLUME MASTER
W
: TURN KNOB
r
: CLICK
s
: DOUBLE-CLICK
t
: CLICK AND HOLD BRIEFLY
Zentera Manu 2.0 E-D 28.08.2001 15:00 Uhr Seite 9