


12
ZENTERA-MANUAL
6.4 STORE (NAME):
Press
r
STORE to save preset settings.
The indicator in the display will flash.
Then select the desired memory slot for the preset by means of
the
W
PRESET knob.
In order to name the preset, use
W
PARA 1 to move the cursor
and select the desired letters, numbers or symbols from the
available font. If you tap
r
PARA 2 once you have made your
selection, the cursor will automatically jump to the next position,
sparing you the necessity of having to navigate with PARA 1.
The preset is stored by pressing
r
STORE repeatedly.
You can cancel the storage process at any time by pressing
r
TUNER or
r
TAP.
Note1: Solely the PRESET and PARA knobs are enabled during the
storage process. All other knobs are disabled.
Note2: If you want to edit and store presets you must deactivate
the „MEMORY PROTECTION“ in the system menu. See 7.1 below.
6.5 FOOTSWITCH
You can connect a standard 1-way or 2-way sustain pedal to the
zenTera
®
and use it to switch to the next higher preset number
(UP) or next lower preset (DOWN), or back and forth between
two presets (TOGGLE). Go to the system menu to assign the
desired UP/DOWN/TOGGLE function
(see 7.12, FOOTSWITCH ASSIGN).
The zenTera
®
detects the type of connected switch.
In order to be able to switch back and forth between two presets
with a 1-way or 2-way sustain pedal, you have to select the
appropriate setting in the system menu and you must assign a
marker to one of the two presets. To this end, select the desired
W
PRESET and double-click
s
PARA 2. This sets the marker. Select
the second
W
PRESET. You can then switch back and forth via
sustain pedal between this most recently selected preset and the
preset that you assigned the marker to. This is a convenient
option when just two sounds will suffice, say when you're
rehearsing one song.
6.6 TAP
In addition to letting you sync up delay to the tempo of a song
manually (see 5.3, TAP), the TAP button gives you another option:
you can use it to create short samples of guitar patterns or riffs.
The zenTera
®
plays these samples back in repetitive loops so that
you can play a melody or another riff over them.
The optionally available Stageboard is far better suited for this
purpose than the TAP button on the amp, because you have to
press and hold the latter while you're recording samples. Using
the Stageboard frees up both hands, which tends to make
playing somewhat easier for most of us.
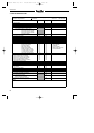
To sample a riff, proceed as follows:
• Tap the
r
DELAY knob. You have just set the amp to DELAY
mode.
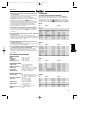
• Then select one of the "HOLD" delay effects by turning the
W
TYPE knob (see the table below).
If you want your sample to repeat at an unvarying volume level,
set FEEDBACK to 100 via
W
PARA 2. At values lower than 100, the
volume of the sample becomes softer with every repetition.
Press and hold the TAP button while you record your sample.
When you release the button, the zenTera
®
will generate a loop
that is played back repeatedly.
DELAY
TYPE PARA 1 PARA 2
Hold Echo
>>PLEASE USE TAP BUTTON<< Feedback 0 - 100
Hold Ping Pong Feedback 0 - 100
Hold Tape Feedback 0 - 100
7.0 THE SYSTEM MENU
As its name would indicate, the system menu lets you edit basic
system settings. For example, you can use it to set the zenTera
®
to
stereo or mono mode, calibrate your foot pedal and assign MIDI
functions.
To access the system menu, press and hold the
t
TUNER button.
Access the submenus by turning the
W
TYPE knob. Use
W
PARA 1
and
W
PARA 2 to edit the given settings.
Caution! You don't need to confirm any changes, they take
effect immediately!
You can quit the system menu at any time by tapping
r
TUNER.
7.1 MEMORY PROTECTION
If you want to protect your user presets (1 - 100) against
unintentional overwriting, you can enable memory protection in
this menu. Note that if you choose to do so, you must also
disable it before you can edit your presets.
Turn
W
TYPE until MEMORY PROTECTION appears in the display.
Use the
W
PARA 1 or
W
PARA 2 knob to now activate (ON) or
deactivate (OFF) memory protection.
7.2 MODE
This feature lets you adapt the zenTera
®
to a 2 x 12" or a 4x 12"
loudspeaker configuration. The first option is designed for the
zenTera’s internal speakers, the latter option is designed specifi-
cally for connecting an additional 4 x 12" cabinet. Note that this
circuit was fine-tuned using the Hughes & Kettner CC 412 as the
reference cabinet. This means that you’ll achieve the best sonic
results using this model of cabinet.
Beyond that, for both loudspeaker configurations you can
determine if the output signal is sent to the power amp and the
Recording Out Stereo or Mono circuits.
Turn
W
TYPE until MODE appears in the display. Use
W
PARA 1 or
W
PARA 2 to select MONO 2 x 12 or STEREO 2x 12", or MONO 4 x
12" or STEREO 4 x 12".
7.3 WAKE UP
When you power the zenTera
®
up, it will come on line in one of
two modes that you can determine.
1) Either it activates with the preset that was active before you
last shut it down.
2) Or it activates with the settings that were active before you
switched it off.
The difference is that in the first scenario any settings that you
made but did not store are reset. This means that the preset
reports back in its original stored state. In the latter case, these
modifications are retained. This is an important distinction to
make, particularly in live situations when you have tweaked your
sound on stage to suit the venue. When you opt for the latter, the
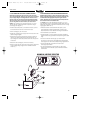
W
: TURN KNOB
r
: CLICK
s
: DOUBLE-CLICK
t
: CLICK AND HOLD BRIEFLY
Zentera Manu 2.0 E-D 28.08.2001 15:00 Uhr Seite 12