iLive Fixed Format Getting Started Guide 14 AP7141 iss.2
Step 4 – Name and colour channels
Having chosen a Template show as your starting point, and set your operating preferences, you may wish
to prepare for your show by naming your inputs, mixes and DCAs, and applying colour to help identify
them by type or to highlight important channels. You can name channels with up to 5 characters entered
from an on-screen touch keyboard. You can colour each or ranges of channels with one of 6 colours or
no colour. This colour is displayed as the backlight to each strip LCD.
There are two ways to name and colour channels:
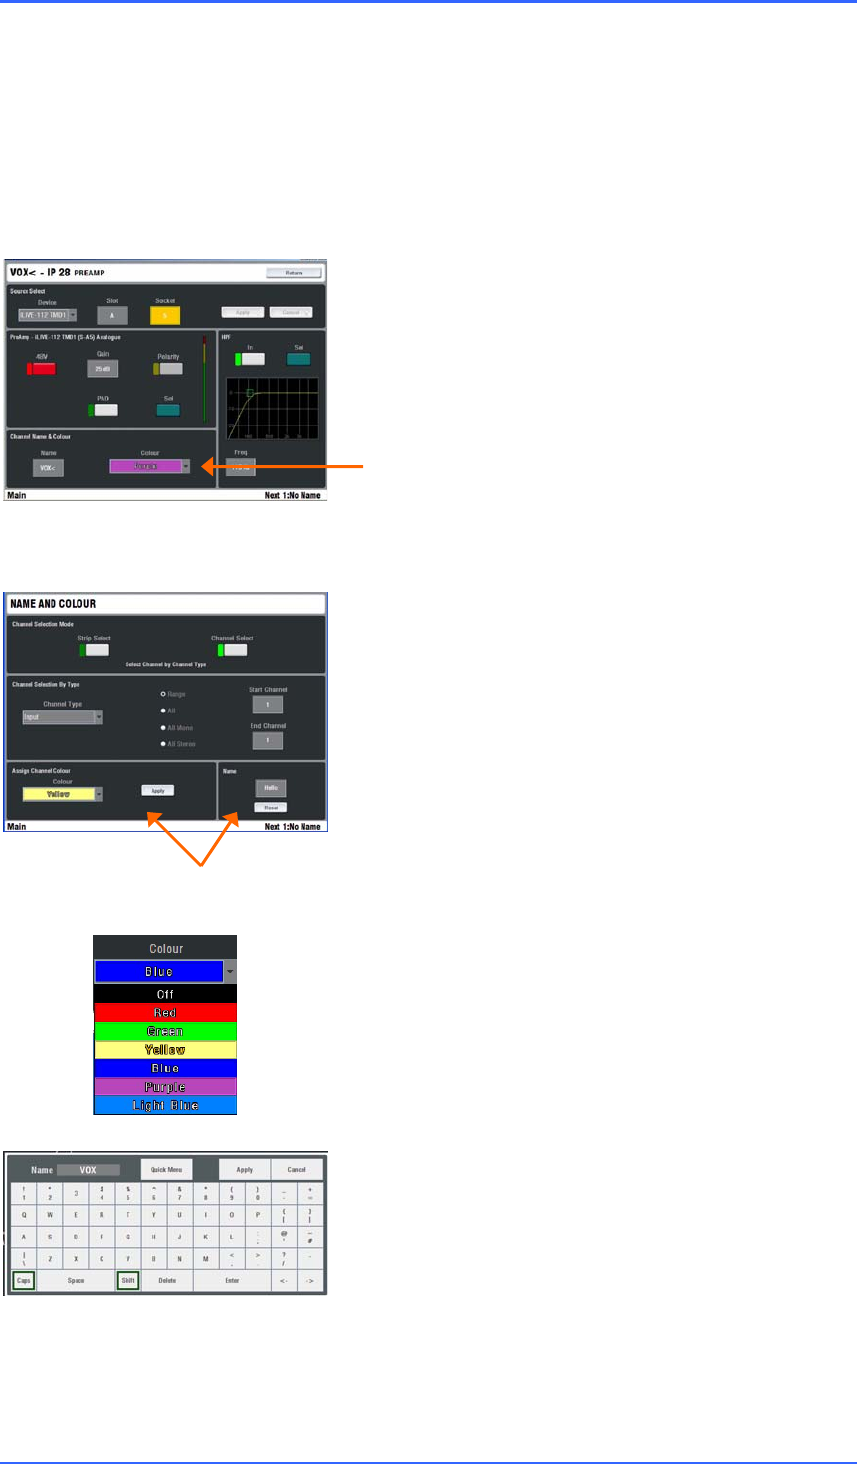
Channel Processing view
In normal mixing mode, press SEL to access the channel
processing. Make sure all screen keys are turned off so that
the channel parameters are displayed on the screen.
Navigate to the name and colour screen:
Input Channels - PREAMP screen
Mix Masters - EXT INPUT screen
DCA Masters – Top toolbar
Name & Colour screen
Press the TouchScreen NAME & COLOUR key.
Strip Select / Single Strip Select - Press a strip SEL key.
Touch Name to open the on-screen keypad. Touch Colour to
select a colour. Touch Apply.
Strip Select / Block Strip Select - Press the first SEL key
then the last in the range you want to colour. All green SEL
indicators in the range light. Touch Colour to select the
colour. Touch Apply.
Note – Naming is disabled in Block mode, apart from
resetting a block of names to their channel numbers.
Channel Select - Select Channel Type and the range. Select
Colour and press Apply.
Note - To restore the SEL keys to normal mixing mode turn
off the NAME & COLOUR key.
Touch Reset to delete the name and restore the channel
number.
Quick Menu
A quick naming facility opens a second keypad to let you
create and store up to 48x of your most often used names.
To apply, press a strip SEL key and simply touch a name.
Touch Edit to edit or create new names.
Note – The user defined quick names are stored in the Show
memories. These get overwritten with the contents of the
Show when it is recalled.


