


Page
51
APPENDICES
6
ASSEMBLY INSTRUCTIONS
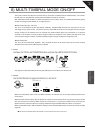
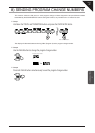
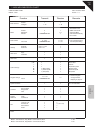
PARTS PROVIDED
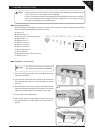
Before attempting to assemble the CN piano unit, ensure that all parts are included. A Phillips-head screwdriver
will also be required to assemble the unit (not included).
(A) Piano (x 1)
(B) Pedal board (x 1)
(C) End panel (x 1 each for left and right)
(D) Back panel (x 1)
(E) Adjuster bolt (x 1)
(F) Screw:
φ
4 x 16 (x 4)
(G) Screw:
φ
4 x 20 (x 4)
(H) Screw:
φ
4 x 30 (x 2)
(I) Screw: M6 x 25 (x 4)
(J) Cord clamp (x 2)
(K) Headphone hook and screws (x 1 set)
(L) Power cord (x 1)
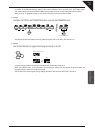
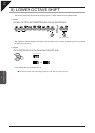
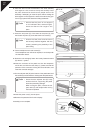
ASSEMBLY SEQUENCE
1. Screw the adjuster bolt (E) into the threaded screw hole
provided on the pedal.
2. From the side of the screw that is already on the backside of
the pedal board (B), slide and insert the bracket of the end
panel (C).
3. While pressing the end panel (C) against the pedal board (B),
tighten the already-provided screws, one each on the left and
right sides, and then tighten two screws (F) on each side.
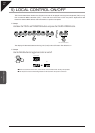
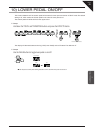
4. Untie and pull out the pedal cable.
5. Set the back panel (D) and tighten the screws (G) (H) into
the prepared holes. Loosely tighten the screws with the *
symbol.
Caution
y
Ensure that this instruction manual is read thoroughly before attempting to assemble the CN
piano, and that two or more people work on assembly.
y
It may be necessary to tilt the unit by 90 degrees while assembling the CN piano. During this
time, ensure that hands are not caught in the piano, keyboard lid, or score stand, and that
the piano is not dropped on an individual’s feet.
Caution
y
Be careful not to scratch or damage the
fl oor, piano, or stand at the time of assembly.
(H)*
(G) (G) (G)
(H)*
4
y
5
(D)
(Untie this twist tie from the cable)
(E)
1
(B)
(C)
(F)
(F)Already-provided screw
2
y
3
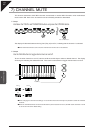
(K)
Headphone hook and screws
(J)
Cord clamp
(E)
Adjuster bolt
(F)
φ
4 x 16
(G)
φ
4 x20
(H)
φ
4 x30
(I)
M6 x 25
Screw
(x 2)