


7
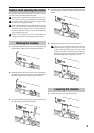
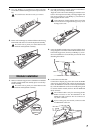
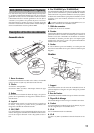
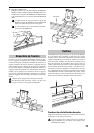
4. Use your Phillips (+) screwdriver to remove the four
screws that hold the retaining bar to the keyboard assem-
bly.
Be careful not to lose the screws you remove.
5. Remove the retaining bar, and then lift the module using
both hands and remove it from the keyboard assembly.
Be careful not to pinch your hand between the
module and keyboard assembly.
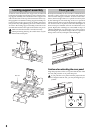
Module installation
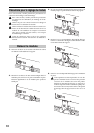
1. Make sure that the support arm is folded down. Hold the
module in both hands and carefully place it on the key-
board assembly.
Be careful not to pinch your hand between the
module and keyboard assembly.
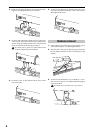
Cross-section of
keyboard cover
toward keyboard
toward module
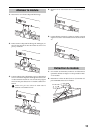
2. Orient the retaining bar correctly as shown in the illustra-
tion, and place it on top of the module.
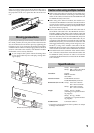
Align the screw holes in the retaining bar with the screw
holes in the keyboard assembly, and finger-tighten the
four screws. Finally, use your Phillips (+) screwdriver to
firmly tighten the four screws.
Don’t attempt to forcibly tighten the screws if the
screw holes are not aligned. Doing so may cause
damage to the unit.
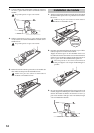
3. Using the handle located on the rear panel, lift the mod-
ule up, align the screw holes in the module with the screw
holes in the support arm, and use your Phillips (+) screw-
driver to install the two screws B that you removed when
detaching the module.
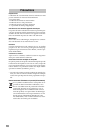
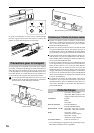
4. Connect the included cable.
Connect the L-shaped plug of the cable to the TO KYBD
connector on the module, and connect the straight plug
to the TO MODULE connector on the keyboard assem-
bly. If the TO MODULE connector is already being used
to connect another module, then use the TO MODULE
(2nd) connector.
The included cable is only for connecting the TO
KYBD connector to the TO MODULE or TO
MODULE (2nd) connector. Do not connect it to
any other connector.
If you’re using only one module, connect it to the
TO MODULE connector.