


4.Pattern mode
4.Pattern mode
27
Creating a phrase pattern
There are three ways to create a phrase pattern.
Realtime recording
Use the Keyboard function to play the step keys at the exact
timing you wish to record them.
Step recording
Use the Keyboard function to specify the pitch of the note for
each target step to create the phrase.
Event editing
Edit the data (trigger, pitch, gate time) for each step to create
the phrase.
If you wish to erase the phrase of each part before you create
your own rhythm data, refer to p.29 "Erasing phrase data from
a part."
Realtime recording
Please refer to "Realtime recording (Using the Keyboard func-
tion to create a phrase)" (p.16) in chapter 3. Basic operation
(Quick Start).
Step recording
Please refer to "Step recording (Using the step keys to create a
phrase)" (p.16) in chapter 3. Basic operation (Quick Start).
About the Target Step
Target Step 1.01...4.16
The value shown in the display when the parameter select LEDs
indicate Step Rec is called the "target step." The value shown in
the display indicates the location of a certain step in the phrase
pattern. To change the target step, you can use the dial or press
one of the sixteen step keys. Alternatively, you can hold down
the Shift key and use the Select keys to move forward or back-
ward in single steps.
The maximum number of steps will depend on the length
and scale/beat settings.
In the case of a pattern with a length of 2 or greater, you can use
the Select keys to move the select LED in the lower line (red) in
order to change the length that is shown by the step keys, and
verify or modify the trigger locations.
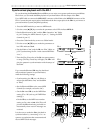
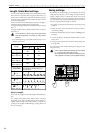
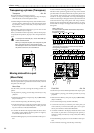
Length
1
2
3
4
1234
1234
1234
1234
For
x
16,
x
16
Area shown by the step keys
For 3
x
12
Steps 1...16
Steps 17...32
Steps 33...48
Steps 49...64
Select
LED display
Steps 1...12
Steps 13...24
Steps 25..36
Steps 37...48
When the Keyboard function key is on, the step keys
will not indicate the target step. When the Keyboard
function is off, the step key corresponding to the target
step will blink.
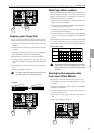
Example display
Length 1
Step 10
Length 3
Step 5
(37)
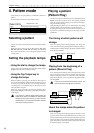
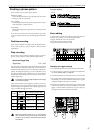
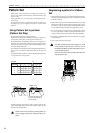
Event editing
A phrase pattern consists of the following three data items for
each step. For each step, you can set these three items.
• Trigger: Whether or not a note will sound
• Pitch: The pitch that will be sounded
• Gate time: The duration of the sound
Trigger
Gate time
(duration of
the sound)
Pitch
Step
5 6 7 8
9 10 11 12 13 14
C2 G2 F2 D2 D2 A1 E2 A2
1 2 3 4
1.25 2.00 0.5 0.5 4.00 1.50 2.00 1.00
On On On On On On On On
Changing the trigger settings
1. Turn off the Keyboard function key (the key will be dark).
2. Use the cursor keys to make the parameter select LEDs indi-
cate either Pattern, Tempo, or Step Rec.
3. Use the Part Select key to select the part that you wish to edit.
4. For a pattern with a pattern length of 2 or more, you can use
the Select keys to move the red select LEDs to left or right to
change the length location that you will edit.
5. The step keys will light to indicate the trigger locations of the
pattern for that part. You can press each key to switch the
trigger on/off for that step. Each time you press a step key,
the trigger will alternate on (lit) and off (dark).
4
3
5
2
5