


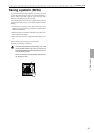


5.Song mode
36
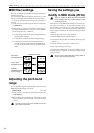
Specifying the pitch of each
pattern
Pitch Offset –24...24
This function offsets the pitch of the pattern at the specified
position within the song.
Pitch Offset simply offsets the pitch within the song. It
does not affect the pitch data of the pattern itself.
1. If the song is playing, press the Stop/Cancel key to stop play-
back.
2. Use the cursor keys to make the parameter select LEDs indi-
cate Position.
3. Use the dial or Select keys to select the position whose pitch
you wish to offset.
4. Use the cursor keys to make the parameter select LEDs indi-
cate Pitch Offset.
5. Use the dial to specify the desired pitch offset. +/–1 offsets
the pitch by a semitone, +/–2 by a whole tone, +/–7 by a fifth,
and +/–12 by one octave.
Even when the parameter select LEDs indicate Pitch Offset,
you can use the Select keys to move the position forward or
backward in single steps.
3,5
2,4
3
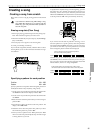
Editing a song
You can insert a new pattern into a song, or delete an existing
pattern. You can also add knob movements or your own per-
formance to a song.
If you wish to keep the edited song, you must perform
the Write operation. If you select a different song or turn
off the power without performing the Write operation,
the song will return to the state in which it was before
you edited it.
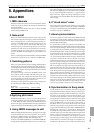
Inserting a pattern at a specified
position (Insert Pattern)
You can insert a pattern at a specified position, and subsequent
patterns will be moved backward (toward the end of the song).
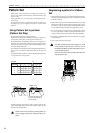
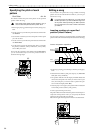
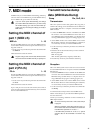
Insert a new pattern at position 3
Position
1
End
Pattern A01
(16Steps)
Pattern D01
(32Steps)
Pattern B01
(36Steps)
Position
2
Position
3
Position
4
Position
5
Position
6
Position
7
Pattern A01
(16Steps)
Pattern B20
(24Steps)
Pattern B01
(36Steps)
Position
1
End
Pattern A01
(16Steps)
Pattern D01
(32Steps)
Pattern B01
(36Steps)
Position
2
Position
4
Position
5
Position
6
Position
7
Position
8
Pattern A01
(16Steps)
Pattern B20
(24Steps)
Pattern B01
(36Steps)
Position
3
Pattern D01
(32Steps)
Before
inserting
After
inserting
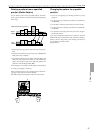
1. If the song is playing, press the Stop/Cancel key to stop play-
back.
2. Hold down the Shift key and press step key 13 (Insert Pat-
tern). (The 13 key will blink.)
3. The position indication in the display will blink. Rotate the
dial to select the position at which you wish to insert a pat-
tern. (For example if you wish to insert a pattern into posi-
tion 3. make the display blink "003.")
4. Press step key 13 once again, and a pattern will be inserted in
front of that position. (The key will go dark.)
To cancel, press the Stop/Cancel key.
The pattern that is inserted will be the pattern which had previ-
ously been at that position. Now you can specify the desired
pattern for the position that was inserted.
Data following the inserted pattern will be moved backward.
2,4
2
3