


3
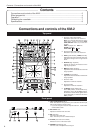
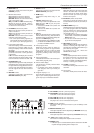
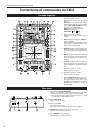
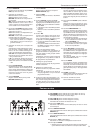
Connections and controls of the KM-2
10. MONITOR knob
Adjusts the output level of the front panel
PHONES jack (F5).
11. Monitor select switch
CH1: Monitor the sound of channel 1.
CH2: Monitor the sound of channel 2.
MASTER: Monitor the sound that is being
sent to the master output.
MIX (press CH1 and CH2 simultaneously):
Monitor the sound of channel 1 in the L
channel of the headphones, and the sound
of channel 2 in the R channel.
12. FX INSERT (effect insert) switch
CH1: Insert the effect at the pre-fader lo-
cation of channel 1.
CH2: Insert the effect at the pre-fader lo-
cation of channel 2.
MASTER: Insert the effect at the master
(after the cross-fader) location.
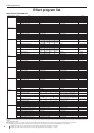
✩ For some special effect programs, the
effect will be inserted at a different loca-
tion. (Refer to p.4 "Effect program list.")
13. Level meter mode switch
Selects the display mode of the level meter.
Each time you press this switch, the fol-
lowing two display modes will be selected
alternately.
CH1/CH2: The meters will display the in-
put levels of channels 1 and 2 (pre-fader)
respectively.
L/R: The meters will display the L channel
and R channel levels of the master output.
Use CH1/CH2 at a maximum of 0 dB~1 dB.
14. ULTRA BOOST knob
Adjusts the strength of the newly developed
Ultra Boost effect. Turning this knob toward
the right will increasingly boost the low fre-
quency range and simultaneously empha-
size the edge of the bass drum and bass
sounds.
15. MASTER volume
Adjusts the volume that is output from the
MASTER OUTPUT jacks (R6).
16. BOOTH volume
Adjusts the volume that is output from the
BOOTH OUTPUT jacks (R7).
17. BPM display
Displays the tempo of the song; i.e., the
BPM.
18. ADJUST (BPM adjust) keys
These keys make fine adjustments to the
BPM set by the TAP key (19) or by auto
BPM detection.
% increases the BPM value (makes the
tempo faster)
fi decrease the BPM value (makes the
tempo slower)
19. TAP key
When you tap this key twice or more in time
with the beat of the song, that beat will be
detected and the corresponding tempo dis-
played in the BPM display (17).
✩ The detectable range of BPM is 40~999.
✩ For details on the BPM function, refer to
p.5 "About the BPM function."
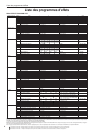
20. Effect program knob
Rotate this knob to select an effect pro-
gram. Effect programs are organized into
eight groups such as FILTER or MOD
(modulation), and each group contains ten
programs, providing a total of 80 preset
programs.
21. Effect group display
This indicates the name of the currently se-
lected effect program group.
22. Effect number display
This shows the currently selected effect
program number.
✩ For details on the effects provided by
each program, refer to p.4 "Effect pro-
gram list."
23. Program map keys 1–8
Of the 80 effect programs, you can assign
eight of your favorite programs to the pro-
gram map keys for immediate selection.
24. HOLD switch
While this switch is lit, the touch panel (30)
will be in the Hold state. In this state, the
previous state of the effect will be main-
tained even when you remove your finger
from the touch panel.
25. FX ON/OFF (effect on/off) switch
Each time you press this switch, it will al-
ternate between lit (effect on) and dark (ef-
fect off).
26. SAMPLE BANK keys 1–4
Sampled phrases are stored in these keys.
If an effect program other than SAMPLE/
PLAY is selected, the stored phrase will
play back as long as you hold down the
corresponding key 1–4.
✩ The playback sound will be output to the
channel that is selected by the FX IN-
SERT switch (12).
✩ You can also use the touch panel to ap-
ply an effect to the playback.
27. REC/STOP (record) key
When a SAMPLE/PLAY effect program is
selected, recording will begin when you
press this key. Recording will end when you
press this key once again.
For details refer to p.6, "About the
SAMPLE/PLAY effects."
28. WRITE key
Newly sampled phrases will be lost when
the power is turned off. If you wish to keep
the phrases, you must write them into
memory. For details on the Write procedure,
refer to p.7 "Saving your samples."
29. X-FADE (crossfader)
This sets the mixing ratio of channel 1 and
channel 2.
30. Touch panel
Use this to modify the sound of the effect.
Rear panel
R1. CH1 PHONO (channel 1 phono input jacks)
R2. CH2 PHONO (channel 2 phono input jacks)
Turntables can be connected to these jacks.
R3. CH1 LINE IN (channel 1 line input jacks)
R4. CH2 LINE IN (channel 2 line input jacks)
CD players etc. can be connected to these jacks.
R5. GND (ground) connector
Connect the GND (ground) connector of your turntable(s) to this
connector.
R6. MASTER OUTPUT jacks
These jacks output the volume adjusted by the MASTER volume (15).
R7. BOOTH OUTPUT jacks
These jacks output the volume adjusted by the BOOTH volume (16).
R8. ~AC9V (power supply) connector
Connect the included power adaptor to this connector.
R9. POWER switch
✩ It will take up to 10 seconds after the power is turned on for the KM-
2 system to begin operating and be ready to use.