


7
Operation/Calibrating the crossfader
Saving a sample - "WRITE"
Phrases that you record using the REC/STOP key are only
written temporarily into the internal memory of the KM-2, and
will be lost when the power is turned off. If you wish to keep
them, you must perform the WRITE operation. Conversely,
phrases you have already saved using WRITE will not be erased
by additional recording as long as you do not perform the WRITE
operation again.
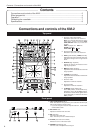
1) Press and hold the WRITE key (28) for two seconds. The WRITE
LED will begin blinking, and the KM-2 will be in write-ready mode.
2) Press the SAMPLE BANK key(s) 1–4 (26) that you wish to
save. (The SAMPLE BANK you pressed will blink.) You may
select two or more banks to write.
✩ If you press the TAP key (19) or the FX ON/OFF switch (25)
at this point, the WRITE operation will be cancelled.
3) Press the WRITE key (28) once again, and writing will be-
gin. Writing will require a maximum of 20 seconds per bank.
While writing is being performed, the level meter will indi-
cate the progress. When writing is completed, the WRITE
key (28) LED will go dark.
✩ Never turn off the power during the writing process. Doing
so will cause the data to be lost.
About the program map keys
Your favorite effect programs can be assigned to the program MAP 1–8 keys for quick access. The program map keys store not
only the effect program number, but also the HOLD ON/OFF status, the HOLD position, and other data listed below.
Data stored in a program MAP
• Effect program group number
• HOLD ON/OFF status and location (coordinates)
• For the BPM FX group, the BPM value that was displayed
when you stored the MAP
• For the SAMPLE/PLAY group, the SAMPLE BANK number
used (the SAMPLE BANK 1–4 that was selected when you
stored the memory will be remembered)
Storing to a MAP memory
1) Press the MAP number 1–8 (23) in which you wish to store.
2) Use the effect program knob (20) to select the effect pro-
gram that you wish to store.
If you wish to store with HOLD ON, select the HOLD ON
(LED lit) state, and touch the touch panel (30) at the de-
sired coordinates.
3) Press and hold the currently-lit program map key (23) for
two seconds. When the MAP LED has blinked three times,
the data has been stored.
• At this time, the value in the effect number display will also blink.
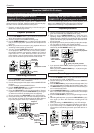
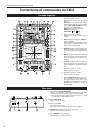
Calibrating the crossfader
On the KM-2 you can adjust the point at which CH 1 and CH 2 of the crossfader begin to change.
(With the factory settings, the change will begin with minimal movement.)
1) Turn the power off.
2) While holding down the WRITE key (28) and the REC/STOP key (27), turn the power on.
When you do so, the BPM display will show “CAL,” indicating that you are in Calibration mode.
3) Now if you move the crossfader (29), the LEDs of SAMPLE BANK keys 1–4 (26) will light accordingly.
The point at which the light changes from 1 → 2 is the point at which the crossfader currently starts changing from CH 1 to CH 2.
The point at which the light changes from 4 → 3 is the point at which the crossfader currently starts changing from CH 2 to CH 1.
4) First, move the crossfader to the location at which you want begin changing from CH 1 → CH 2.
5) When you press the REC/STOP key (27), the switching point will be updated.
6) Repeat steps 4 and 5 to set the CH 2 → CH 1 point.
7) When you press the WRITE key (28), the data for the specified points will be stored in internal memory, and you will return to
normal operating mode.
✩ The switching points cannot be set to a location where BANK LED 2 and 3 are lit simultaneously.
✩ The minimum switching point is approximately 3.0 mm from the left or the right. It is not possible to set the switching point
closer to the left or right edge.
(If you perform step 5 with the crossfader moved all the way to left or right, the switching point will automatically be set to the
minimum location.)
✩ The calibration data is preserved even when the power is turned off.