


11
Owner’s Manual
Owner’s Manual
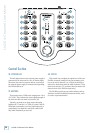
If you plug a cable into the left aux output
jack, and leave the right output jack empty,
the right and left signals are summed together
to provide a mono output.
The stereo aux output from these connectors is the
sum of all channels whose aux level controls [16] are
set to more than minimum. The aux bus gives you the
chance to make a second mix or send an individual
channel from the mixer, independent of the main level
control [23] or channel level controls [17].
You could use the aux output to feed stage monitors,
or to feed a headphone amplifier so you can wear head-
phones on stage. This lets you get a different mix than
the audience is hearing, plus you get to look a lot cooler
and surprisingly attractive with headphones on.
If you are going out to an external processor, you can
return its processed output to one of the mixer’s line-
level input channels.
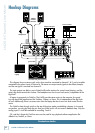
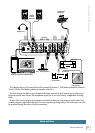
. MAIN OUTs
These 1/4" TRS connectors provide stereo line-
level signals from the main mix. Connect these to
the balanced inputs of the active speakers, or power
amplifier(s) powering your main speakers.
The main mix is the sum of all active channels cur-
rently playing, including any 2 channel FireWire input.
How much of a channel that is heard in the main mix, is
determined by that channel’s level control [17].
If you plug a cable into the left output jack,
and leave the right output jack empty, the
right and left signals are summed together to
provide a mono output.
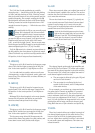
Balanced 1/4" TRS connections offer better
immunity to external noise (specifically, hum
and buzz) than 1/4" TS unbalanced con-
nections. Because of this, it is the preferred
interconnect method, especially in cases where very
long lengths of cable are being used. A long unbalanced
cable carries with it more opportunity for noise to get
into the system — having balanced cables means very
little noise will enter the system. If you must use an
unbalanced connection, keep the cable length to 10 feet
or less (3 meters).
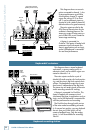
7. HEADPHONES Output
This 1/4" TRS stereo jack is where you plug in your
stereo headphones.
The headphone volume is controlled by the phones
level control [22]. It is not affected by the main level
control [23].
The headphones output is the main mix, taken just
before the main level control [23].
Warning: The headphone amp is designed to
drive any standard headphones to a very loud
level. We’re not kidding! It can cause perma-
nent hearing damage. Even intermediate levels may be
painfully loud with some headphones. Be careful!
Always start with the phones level control turned all
the way down before connecting headphones or making
any connections. Keep it down until you’ve put on the
headphones, and turn it down whenever you play a new
source.
8. DC Input
This DC input connector is used to supply power to
the mixer. Connect the supplied external power supply
here, and plug the other end of the power supply into
the AC mains. The power LED [18] will joyfully illumi-
nate, indicating that the mixer is powered on, and ready
for some super fun.
The universal external power supply that comes with
your mixer can accept any AC voltage from 100 VAC to
240 VAC.
9. FIREWIRE Connection
FireWire (IEEE 1394) is a high-speed serial I/O inter-
face for connecting digital devices. The mixer has one
FireWire connector for transferring digital audio to and
from your computer.
The FireWire interface provides two audio outputs to
your computer:
• Main mix output, left and right. These output
signals are independent of any adjustments
made to the main level control [23]. This al-
lows you to easily record your live performance
directly to your laptop.
• The FireWire loop out switch [21] lets you
choose if you want the FireWire input to be
connected to the FireWire output for recording.
See page 15 for more details of this switch.
The FireWire interface also lets you use your com-
puter to play back two channels into the mixer:
• Left and right signals from your computer are
added to the main mix. The FW in control [20]
allows you to adjust the level of the incoming
audio being added to the main mix.
See Appendix D on page 21 for more FireWire details,
and the block diagram on page 20.