


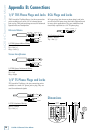


Owner’s Manual
Owner’s Manual
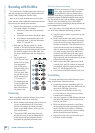
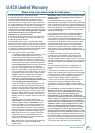
* In Tracktion, it is not necessary to mute the output
of the track you are overdubbing on. Instead, select the
input to the track (it will be highlighted in red) and dis-
able the end-to-end function.
You’ll hear existing tracks playing back via the
FireWire in, and you’ll be monitoring the track you are
recording through the U.420’s headphones or main out.
When you play back the recording, you’ll hear the track
you’ve just overdubbed without un-muting anything.
Other tips
• One drawback of using direct hardware moni-
toring (vs. through-DAW monitoring) is that
the track you are recording will not normally
be able to take advantage of any effects that
the DAW’s mixer has to offer, such as a reverb
on the vocal being recorded, or a guitar amp
simulation on a directly attached instrument.
One workaround for this is the following:
• Set the latency on your DAW to as low as
the computer can handle, and set the U.420
software console panel to the same value
(see page 25 for more information on the
console).
• Do not mute the channel on the DAW that
is being recorded. This will allow you to
hear a mixture of the direct hardware
monitor, and the through-DAW signal.
• Apply the effect of choice (reverb, amp
emulation) to the DAW track, which you
will hear mixed in with the direct hardware
monitor source.
• As long as the latency is set low enough,
the timing difference between the direct
and through-DAW signal should be small
enough to not cause distraction.
A word about latency (wait-and-see)
Latency describes the amount of time it takes the
input signal to pass through the system, and reach
the output. When recording a guitar and monitoring
through software, it is the amount of time it takes from
the moment you strike your guitar string, to the moment
you hear it in your headphones. You are used to this la-
tency being very close to zero; when you play your guitar
through a guitar amp, you hear the signal immediately.
So when you are recording and monitoring via software,
you want this latency to be very low.
We would like to set the latency as low as possible, but
the smaller it is, the harder the computer will have to
work. If the latency is very small, the computer needs to
work very hard to quickly transfer the audio in and out.
It may not even be able to keep up, especially if there
are lots of tracks, lots of automation and/or lots of plug-
ins in your work. If this happens, your audio may stop or
“drop out.” Drop outs may also occur if you have a slower
computer or not enough memory.
When recording using the overdub method, it is
important to set the U.420’s latency to it’s lowest oper-
able setting. This means going into the audio interface
property page of your recording program and setting the
latency property to the lowest setting the device and
your system will accept without any drop-outs, distor-
tion or CPU overburdening.
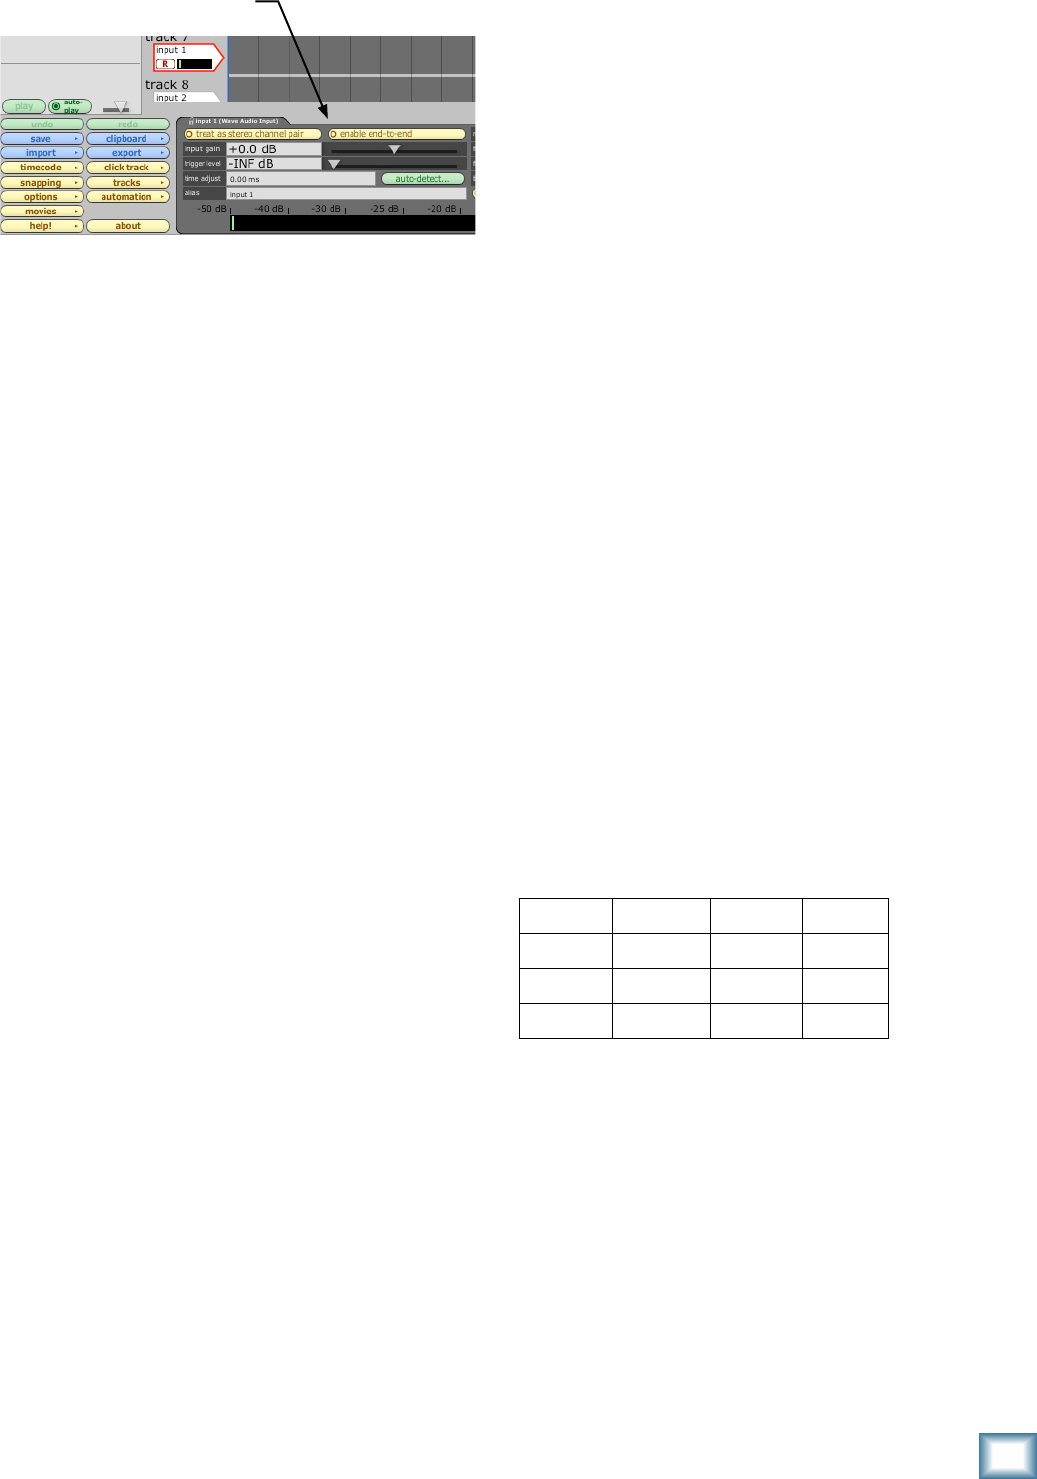
The buffer is an area of computer memory that your
DAW uses to hold audio as it works. The smaller the
buffer, the faster audio gets in and out of your com-
puter, and the lower the latency. The size of the buffer
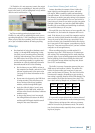
is measured in samples. Depending on your system, a
low setting is typically between 64 and 256 samples. The
more samples, the higher the latency time value. This
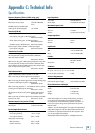
time value varies by sample rate, as shown in this table.
It is generally accepted that delay or latency times of
3.3 ms or less, are tolerable for musical timing accuracy.
Higher latency settings are fine and even necessary
when in live record or performance mode. The same is
true for mix-down mode, especially when you start add-
ing lots of plug-ins.
Samples 44.1 kHz 48 kHz 96 kHz
64 1.5 ms 1.3 ms 0.7 ms
128 2.9 ms 2.7 ms 1.3 ms
256 5.8 ms 5.3 ms 2.7 ms