Evolution eKeys
49
Keyboard User Manual
10
Advanced functions
The Octave '+' and '-' Keys will '+1' or '-1' each time they are pressed. By default, the Oc-
tave '+' and '-' Keys control the octave shift either side of 0. This is the setting every time
you turn the keyboard on. When both lights above the two octave buttons are on, you know
the octave shift is set to 0. We have already seen the operation of these buttons for Octave
control in the getting started guide section.
However, these two '+' and '-' buttons can also be used to control one of five more MIDI
functions.
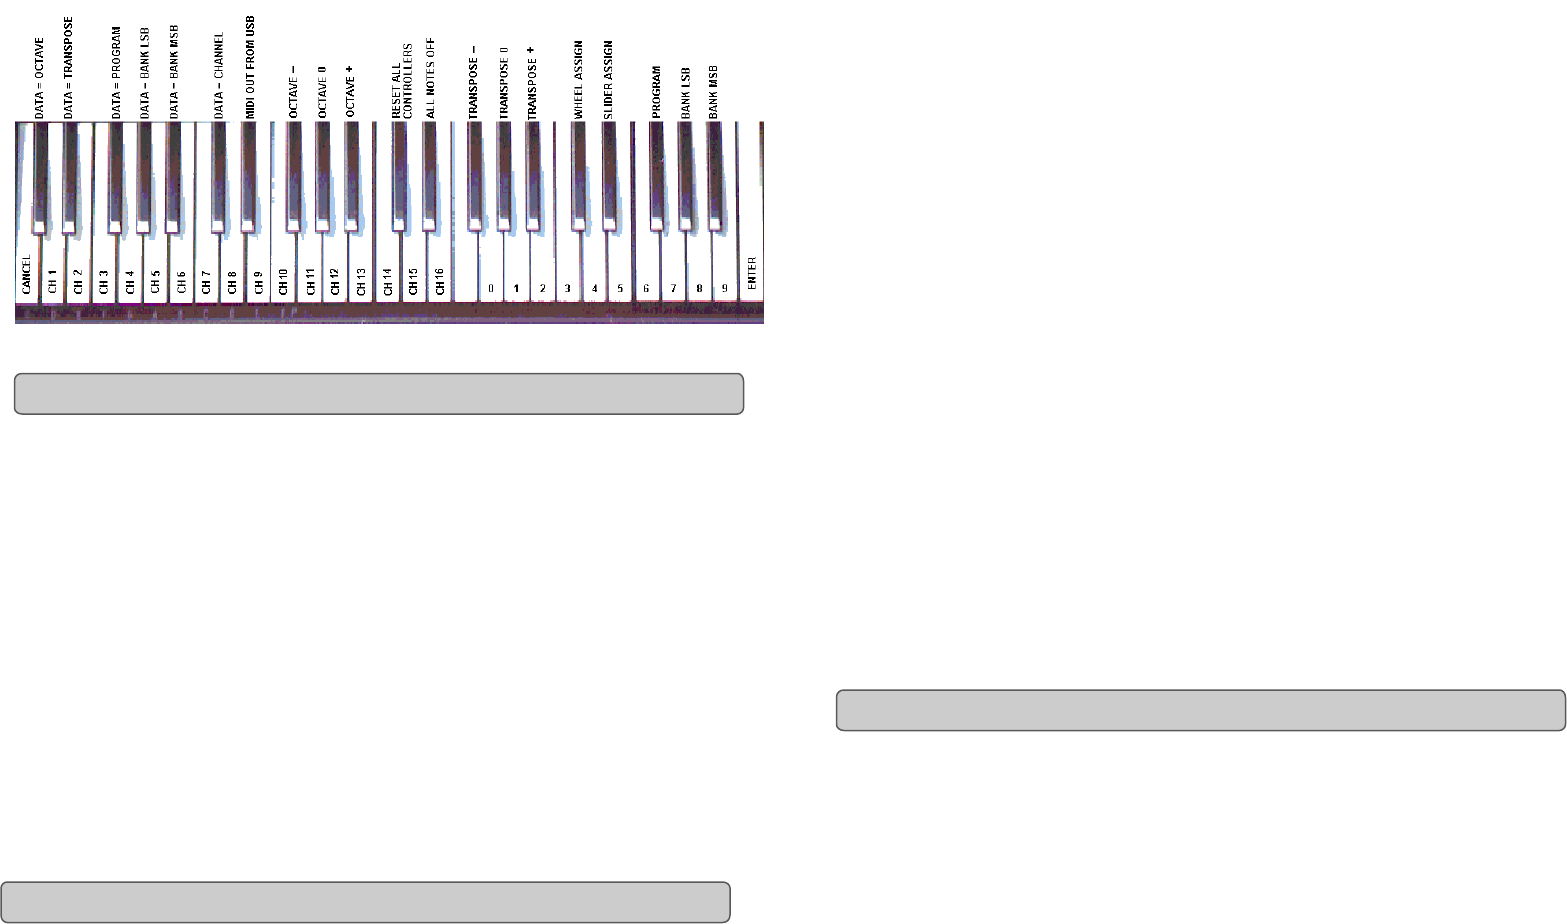
In the diagram above you see that the first 6 black keys are labelled 'DATA = -----'. These
keys are used to select the function of the Octave '+' and '-' buttons. Some of the functions
the '+' and '-' keys can be used for can not send out a value less than 0. In this case, the
lights above the '+' and '-' buttons will remain on.
To select the function of these buttons:
• Press the 'Advanced Functions' button, which will put the keyboard into Edit mode.
• Press the black key that represents the function you want for the '+' and '-' keys.
• Edit mode will finish as soon as you have selected the function and you will be able to
play notes again.
Octave Shift
Octave shift can be achieved using two methods. The first has already been described in
the 'Getting Started Guide' and involves using the octave '+' and '-' keys.
To assign the '+' and '-' keys to control the octave if they are not already:
The Octave ‘+’ And ‘-’ Keys
Definition Of Advanced Functions
15
Evolution eKeys
49
Keyboard User Manual
The Volume Slider
As with the Modulation Wheel, the volume Slider can be assigned to any of the 131 effects at
the back of this manual.
To assign the Volume Slider to an effect:
• Press the 'Advanced Functions' button to get the keyboard into Edit mode.
• Press the Black Key above D4 (named D#4), representing SLIDER ASSIGN.
• Use the Numerical Data Entry keys G3 – B4 to enter the number of the effect you want to
assign to the Volume Slider.
Or
Alternatively, you can use the '+' and '-' buttons to change the value.
• Press the ENTER key (C5).
• Move the Volume Slider upwards to increase the value of the effect.
If you have made an error while entering the numerical data value, you can press the CANCEL
key (C1) to exit Edit mode without changing the effect assigned to the Volume Slider.
Note that each time the keyboard is turned off, the data assigned to the Volume Slider will be
lost. Each time the keyboard is powered up, the Volume Slider will default to being assigned to
Volume(effect number 07).
Pitchbend Sensitivity
It is possible to alter the sensitivity of the Pitchbend wheel by assigning effect number 128 to
the Modulation Wheel or Volume Slider. This will allow you to alter the pitchbend range up to 1
octave up and down.
The eKeys
49
has been designed to make MIDI on your computer as simple as possible. How-
ever, sometimes times things can go wrong. In many cases it is not the keyboard that is at
fault, but the receiving device. To counter this, there are two useful MIDI functions:
All Notes Off
Use this if you find there are hanging notes that you can not stop playing. To send an 'all notes
off' MIDI message:
• Press the 'Advanced Functions' button to get the keyboard into Edit mode.
• Press the Black Key above D3 (named D#3), representing ALL NOTES OFF.
• Edit mode will exit, and there will no longer be any hanging notes.
Just In Case It All Goes Wrong!


