


11
7
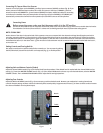
The FLS
®
(Feedback Locating System) LED indicators are invaluable tools in helping to reduce/eliminate feedback. To
use the FLS feature, start by setting all graphic EQ sliders (Fig. 9) to 0. Then, before the audience arrives, increase the
MASTER VOLUME and/or CHANNEL GAIN until feedback occurs. Note which LED illuminates and slightly lower
the corresponding slider. This reduces the gain at the feedback frequency, and can be repeated if necessary to improve
gain before feedback. However, only lower the sliders in small amounts to avoid adversely affecting sound quality.
Fig. 9
Avoiding Acoustic Feedback
Acoustic feedback is the loud howl or squealing sound heard through sound systems as the result of sound from the
speakers re-entering the microphones. Although it does an excellent job of getting the audience’s attention, feedback
should be avoided. When trying to deal with acoustic feedback it is always best to start looking at the placement of the
mics and speakers in the system before resorting to equalization (EQ) adjustment. Make sure that the speakers are
positioned to direct the sound toward the audience and away from the microphones. Position mics as close to the sound
source as reasonable. Moving the mic closer increases the volume of the sound through the system without having to
turn up the gain.
Microphone Usage Guidelines
When practical, a single microphone is preferred. Additional microphones pick up more sound from the speakers and
each mic has to be turned down a little to prevent feedback. However, if you have difficulty balancing the level of
different individuals with one mic, or if you still cannot get sufficient gain, using more mics can offer an advantage.
Giving several singers their own microphones, for example, allows placement of the microphones much closer to each
singer. This increases the volume of the sound at the mic and far outweighs any detrimental effect from using multiple
mics. It also allows the volume of each mic to be adjusted separately for proper balance.
Reverb
Adding reverberation to music can enhance the sound of that music. To add reverb to a microphone, simply turn up the
REVERB control (Fig. 7) on the appropriate input channel. Add reverb in moderation because too much reverb makes
vocals hard to understand. In most cases, it is best not to add reverb to the spoken word.
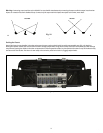
Stereo / Mono Operation
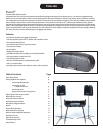
The Escort
™
2000 powered mixer has two input channels (4 & 5) for stereo line sources. If the speakers are situated so
that most of the audience can hear both speakers (Fig. 10 A), it can be advantageous to run the system in stereo. If the
audience primarily hears just one speaker (Fig. 10 B), or if you are using one speaker for the audience and the other for
the stage performers, then it is best to run the system in mono.
Fig. 10
Stereo
Mono
Stereo
Mono
A B
Warning: Connecting a tape machine to the AUX OUT to record while simultaneously connecting the tape machine’s output into the mixer
inputs can create an electronic feedback loop. Connect only the tape machine’s inputs or outputs to the mixer, never both.
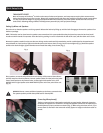
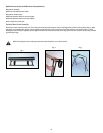
Packing the Escort
®
One of the Escort’s many benets is that the entire sound system can be packed inside its easily transportable case (Fig. 14). Begin by
folding the speaker stands, then secure them into their storage compartment using the two straps. Place the microphone(s) in their storage
compartment, putting the cables in the other compartment or with the speaker stands. Lay the speakers face down on top of the bottom tray
and secure the four latches. The Escort is now ready to be carried or pulled on its built-in, luggage-style wheels.
Fig. 14