


21
Final setup and adjustment
Most of the setup work is now complete. It is now time to make the final adjustments that will prepare
the S-24 for use.
When the following steps are completed, we will have:
➧ Set the Channel gain controls so the “Normal” position faders on the Choir and Solo mics is 0
➧ Set the Automix
™
channel gain controls so feedback is unlikely if the faders pushed to 0
➧ Adjusted the Compressors on the automix channels so that they compress during loud speech but not at
normal speaking levels.
➧ Set the master faders at 0 (full up) so that the system cannot be easily pushed into feedback.
➧ Adjusted the compressors on the Choir and Solo groups (if desired) to help control dynamic range.
➧ Adjusted the Off Level on the Choir and Solo groups so that when these microphones are not in use, the
gain is automatically reduced to help keep noise from these mics out of the sound system.
➧ Set the Monitor sends as required.
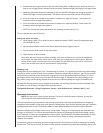
Setting the Choir mics (or other permanent wide coverage mics)
Because of the work you have done previously the next steps should go quickly. Each of these inputs will be
adjusted one at a time using the same procedure.
a. Mute all microphone channels
b. Set the Main and Monitor master faders at 0 (All the way up)
c. If you have not done so before, set the Group Assign switch for the channel to be adjusted. (SOLO or CHOIR)
d. Adjust the channel gain control so that you have the desired level from the mic with the channel fader set to 0
e. If necessary, adjust the EQ controls again for a natural sound quality
f. If this mic needs to be included in the Monitor 1 speaker mix, adjust the monitor 1 send control for
necessary volume through those speakers
g. If this mic needs to be included in the Monitor 2 speaker mix, adjust the monitor 2 send control for
necessary volume through those speakers
h. If this is a mic that will be used together with other microphones (a choir mic for instance), leave this mic
on and repeat steps c-g for the remaining mics
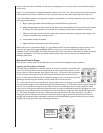
Setting the Solo mics
The procedure for solo mics is the same as for the choir mics above. If the choir mics will be on when these mics
are used, turn them on during setup. Each of these inputs will be adjusted one at a time using the same procedure.
Repeat steps c–g above for the remaining mics.
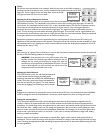
Setting the automix inputs 1–4. (You are almost done!)
a. Un-mute all the Choir and Solo group microphones that are normally used during the service.
b. Un-mute one of the Automix channels
c. If you have not done so before, set the mode switch. (Pulpit: normal Automix; Wireless: Priority Automix)
d. If necessary‚ re-adjust the EQ controls for a natural sound quality