


p.131
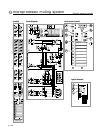
microprocessor muting system
features
mute scenes
There are nine possible scene sources:
MANUAL MUTE SCENES 1–8
, and the
MICRO SCENE
.The MICRO SCENE button G is the enable-switch for the 128
possible
SEQUENCED SCENES.The eight MANUAL MUTES are totally independent
of the
128 SEQUENCED SCENES,giving the system a total of 136 possible mute
patterns.Each of the 136 patterns can consist of any combination of chan-
nel and output mutes,all of the nine possible sources can be combined to
create additional patterns.
creating a mute scene—or editing an existing one
1 Press the EDIT PREVIEW button C
The button will begin to blink,indicating that the system is in
EDIT PREVIEW
MODE
.
2 Select a
SCENE to edit
The system will automatically choose a
SCENE to edit, depending on the
status of the system when
EDIT PREVIEW was selected. If the system was in
SINGLE SCENE mode (switch E depressed), the MUTE SCENE that was cur-
rently active will be selected to edit. If the system was in
MULTIPLE SCENE
mode (switch E not depressed), the MICRO SCENE will be automatically
selected for editing. If a different scene than the default is to be edited,
that scene should now be chosen by pressing one-of-the-nine possible
MUTE SCENE
buttons G and H, it will illuminate to show its selection. Only
one scene can be selected for editing, the condition of the
SINGLE SCENE
button E has no effect in
EDIT mode.
3 When
MICRO SCENE is selected
If
MICRO SCENE
G was selected,then the
UP/DOWN
A buttons should be
used to select the desired
SEQUENCED SCENE (PATCH) to be edited.The DIS-
PLAY B will indicate which of the 128 possible patches is being worked on.
4 Assign channels to the
SCENE
Any channels currently assigned to the SCENE being edited will have their
STATUS LED’s J blinking-red. Pressing the associated MUTE switch K will
assign/de-assign that channel to the
SCENE.
5 Clearing a
MUTE SCENE
If you wish to clear all assigned channels from a SCENE, press-and-hold the
EDIT SAFE D button. After a brief delay, the display will change to CLR?.
Continue to hold the button down until the display shows
CLRD.All chan-
nels assigned to that
SCENE
will be de-assigned and you can start fresh.
6 Saving your edit
Once you have a
SCENE configured the way you want it, either press the
blinking
EDIT PREVIEW
C button to exit
EDIT mode and return to NORMAL
mode, or select another SCENE to edit by pressing its associated switch
H, or—if
MICRO SCENE was selected—press the UP/DOWN A keys to
select a new
PATCH to edit.There is no store-button to press, the
changes take place immediately while editing, and the
SCENE is saved auto-
matically when a new
SCENE is selected or upon exiting EDIT mode.
When returning to
NORMAL mode,
the system will revert back
to the
PATCH that was in
place before entering
EDIT mode.
+
This immediate
change will be most
apparent when editing a
scene that is currently the
active scene—the MUTE
SCENE
that was on when EDIT
mode was entered.
The
MUTE LED
L will change
along with the STATUS LED J
as a channel is added or
removed from the scene
during editing.
+
7