


27
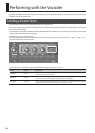
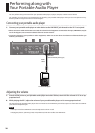
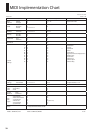
Using the VP-7 in Combination with a Sequencer
By connecting a sequencer, you can use the VP-7 to generate harmony within your studio project, allowing it to be used as a
component in your song productions.
If you want, you can record sound produced by Human Voice/Vocal Designer/Vocoder on an audio track on your sequencer that
is matched to your sequencer’s playback.
MIDI messages from an SMF music le can be sent to the VP-7 to specify the chord progression used to generate the harmony.
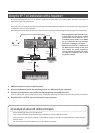
MIDI
Cable
MIDI IN
Keyboard
MIDI OUT
MIDI
Cable
Sequencer
Microphone
MIDI OUT
MIDI IN
Audio
Cable
OUTPUT
INPUT
MIC IN
MIDI Interface
Audio
Interface
1. Make connections as shown in the illustration.
2. Play your keyboard to record the chord progression on a MIDI track of your sequencer.
3. Play back your sequencer, and vocalize into the microphone connected to the VP-7.
As you sing along with the song that’s playing back, the harmony will change according to the chord progression you recorded.
4. Record the VP-7’s OUTPUT onto an audio track of your sequencer.
* When playing back SMF music le or oth-
er data, make sure that the VP-7’s MIDI
receive mode is set to channel 1 (p. 11).
If the MIDI receive mode is set to OMNI,
the VP-7 will receive the note messages
for all parts, including the drum part.
* Make sure that channel 1 is used only as
the MIDI transmit channel of the track
that contains the chord progressions
used to specify the harmony. For details
on using your sequencer, refer to your
sequencer’s manual.
An example of advanced studio techniques
Record the backing chorus part on a MIDI track.
Input a vocal recorded on an audio track of your sequencer to the VP-7’s MIC IN connector.
While listening to your monitor speakers, try out dierent settings on the VP-7 to audition dierent variations for your
backing chorus.
You can also edit the recorded MIDI track to try out dierent harmonies.