5
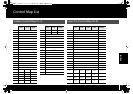
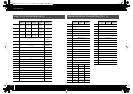
Control Map Guide
English
If you’re using Logic Pro, make the following settings.
The explanation here uses Logic Pro 9 as an example. The procedure might differ if you’re using a different version.
1
Start up Logic Pro 9.
2
Choose PLAY mode (see “Performing (Play
mode)” in the owner’s manual.)
3
Press the [ ] button or [ ] button to move
the cursor to “CTRL MAP” in the display.
The display shows the number of the currently selected control map.
4
Turn the [VALUE] knob to select number 8.
5
Press the [B1] button, then the [B2] button, and
then the [B3] button.
Now you can control Logic Pro 9 from the A-PRO.
6
Close the setup window that’s open in Logic Pro 9.
Refer to p. 9 and p. 10.
Values, such as that for pan, change even though you didn’t adjust
them
Make sure that knobs [R1]–[R9] are in the center position.
Encoder Simulate is assigned to Knobs [R1]–[R9]. If knobs [R1]–[R9] are not at the center
position, control messages will continue to be transmitted from the A-PRO.
You can control PLAY or STOP, but not Volume or Pan
Check the track that is set to “channel 1.”
Pressing the [B1] button or [B2] button will switch the tracks that are assigned to sliders
[S1]–[S8] and knobs [R1]–[R8]. It is not necessarily the case that [R1] and [S1] are
assigned to track 1.
If you want to control the channels in the same order as the tracks, turn the GLOBAL
VIEW setting OFF. If GLOBAL VIEW is ON, you’ll be controlling the group specified by
GLOBAL.
* To check the GLOBAL VIEW status, leave the Track Mixer open in Logic.
* If you want to switch GLOBAL VIEW or change GLOBAL, use control map 7.
Logic Pro
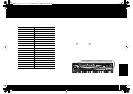
Operation of the A-PRO
Operation of the A-PRO
Operation of the A-PRO
Operation of the A-PRO
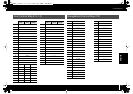
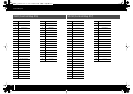
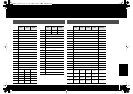
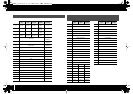
Functions Assigned to the Controllers
Troubleshooting
A-PRO_g_e.book 5 ページ 2010年5月26日 水曜日 午後3時46分