


Tourguide 1039 | 11
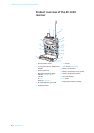
Using the receiver
Using the receiver
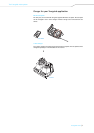
To establish a transmission link between the configured transmitter and receiver,
proceed as follows:
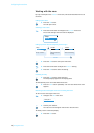
1. Switch the receiver on (see next section).
2. Switch the transmitter on (see the instruction manual for the transmitter).
The transmission link is established and the receiver’s RF signal indication
5
lights up green.
If you cannot establish a transmission link between transmitter and receiver, read
the chapter “If a problem occurs ...” on page 23.
Switching the diversity receiver on/off and
adjusting the volume
After switch-on, the receiver displays the standard display which allows the user to
switch between the receiving channels (see page 12).
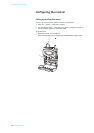
You can configure the receiver via the Setup menu which you can access using
a special key combination during switch-on (see page 14).
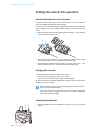
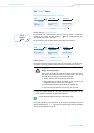
To switch the receiver on:
̈ Turn the volume control
1 clockwise until it clicks.
The red LED ON 4 lights up. The standard display appears on the display panel.
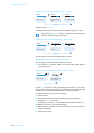
To switch the receiver off:
̈ Turn the volume control
1 counterclockwise until it clicks.
The red LED ON
4 goes off and the receiver switches off.
For information on how to configure the receiver, read the chapter “Config-
uring the receiver” on page 14.
For information on how to configure the transmitter, read the chapter
“Configuring the transmitters for your Tourguide application” on page 22
and the instruction manual for the transmitter used.
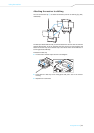
When not using the receiver for extended periods of time, remove the
accupack/batteries.
When you insert a switched-on receiver into the L 2015 charger, the
receiver automatically switches off. The receiver remains switched off
when you take it from the charger after charging. You first have to turn
the volume control
1 counterclockwise until it clicks to be able to switch
the receiver on (turn the volume control
1 clockwise until it clicks).
Ch 4
English
ብ
ቦ
ቢ